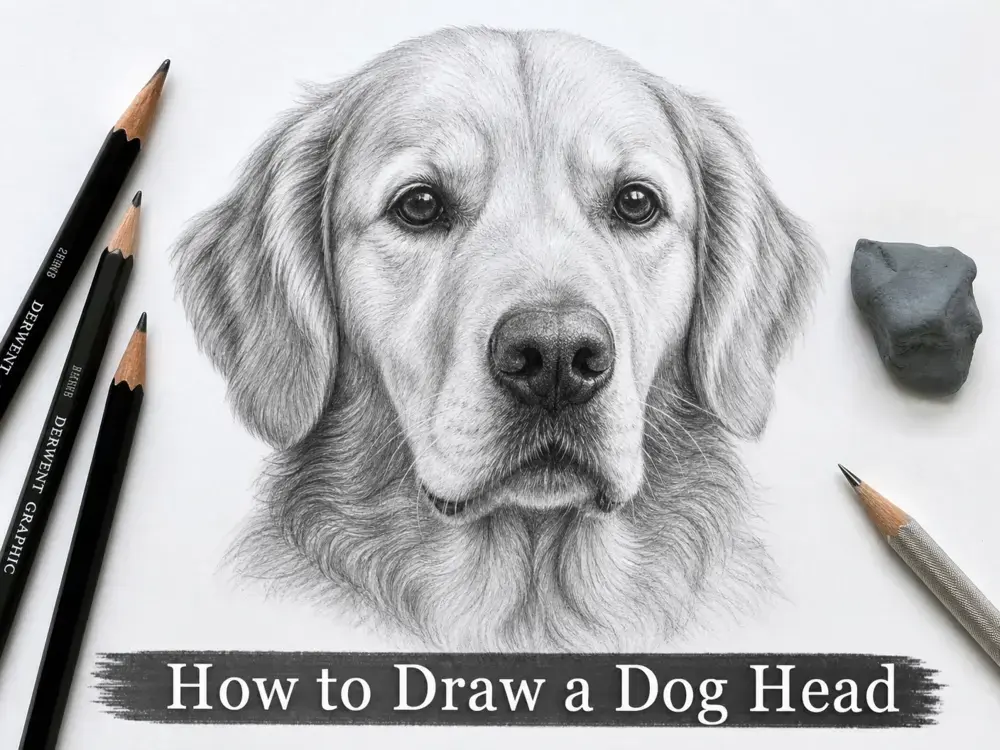
How to Draw a Dog Head (Step-by-Step Realistic Guide for Beginners)
Drawing a realistic dog head may seem difficult at first, but once you understand the basic structure, proportions, and fur flow, it becomes much easier. Whether you want to sketch a beloved pet, improve your animal drawing skills, or create realistic canine portraits, this complete guide will walk you through every stage of the process.
Understanding Dog Head Anatomy
Before drawing a realistic dog, it helps to understand the structure beneath the fur.
A dog’s head is made up of several major forms:
- Skull
- Muzzle
- Jawline
- Eye sockets
- Nose bridge
- Ear placement
- Neck muscles
The biggest mistake beginners make is drawing details too early without understanding these larger forms first.
Important Areas to Study
Eyes
The eyes create emotion and personality. Correct spacing and reflections are essential for realism.
Nose
A dog’s nose contains subtle textures, moisture reflections, and nostril depth.
Fur Direction
Dog fur grows in specific directions across the face. Understanding fur flow instantly improves realism.
Muzzle Structure
The muzzle is not flat. It protrudes outward and affects lighting and shadows.
Art Supplies You Need
You do not need expensive tools to create a beautiful drawing.
Recommended Supplies
- HB pencil for sketching
- 2B pencil for medium shading
- 4B–8B pencils for dark shadows
- Mechanical pencil for fur details
- Kneaded eraser
- Blending stump or cotton swab
- Smooth drawing paper
- Reference photo
Optional:
- Charcoal pencils
- White gel pen for highlights
- Drawing tablet for digital art
Choosing a Good Reference Photo
A quality reference photo makes a massive difference.
What Makes a Good Reference?
Choose a photo with:
- Clear lighting
- Sharp eye details
- Visible fur texture
- High contrast
- Minimal blur
Front-facing photos work best for beginners because they help with symmetry.
Avoid:
- Overexposed images
- Low-resolution photos
- Extreme angles
- Heavy filters
Step 1 – Sketch the Basic Head Shape
Start lightly.
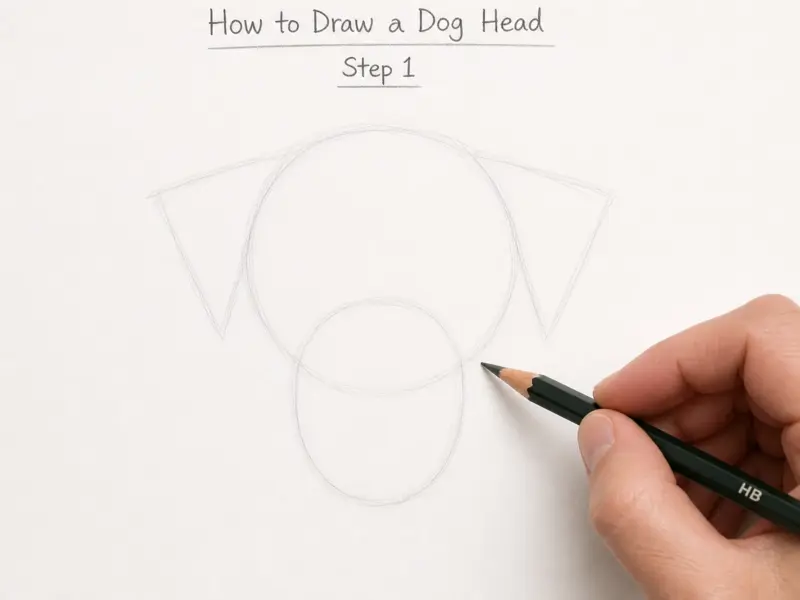
Do not press hard with your pencil because you will refine these lines later.
Begin With Simple Shapes
Break the head into basic forms:
- Circle for the skull
- Oval for the muzzle
- Triangles or curved shapes for ears
- Cylinders for the neck
This construction stage is critical for accurate proportions.
Tips
- Keep lines loose
- Focus on symmetry
- Compare left and right sides constantly
- Don’t add fur yet
At this stage, your drawing should look simple and rough.
Step 2 – Draw the Guidelines and Proportions
Guidelines help place facial features correctly.
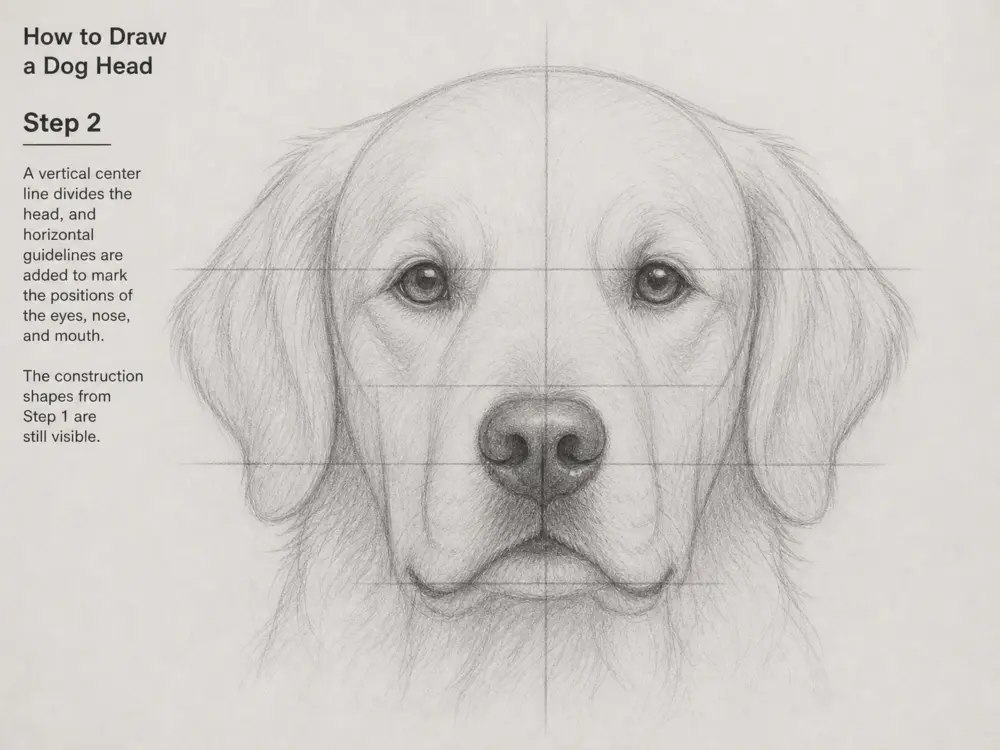
Draw a Vertical Center Line
This line divides the face evenly.
Add Horizontal Guides
Use them to position:
- Eyes
- Nose
- Mouth
- Ear alignment
Eye Placement Rule
Most dogs have eyes positioned roughly halfway down the head.
Nose Position
The nose usually sits near the lower third of the face. Correct proportions are more important than tiny details.
Step 3 – Drawing the Dog’s Eyes
The eyes are the most important part of a realistic dog portrait.
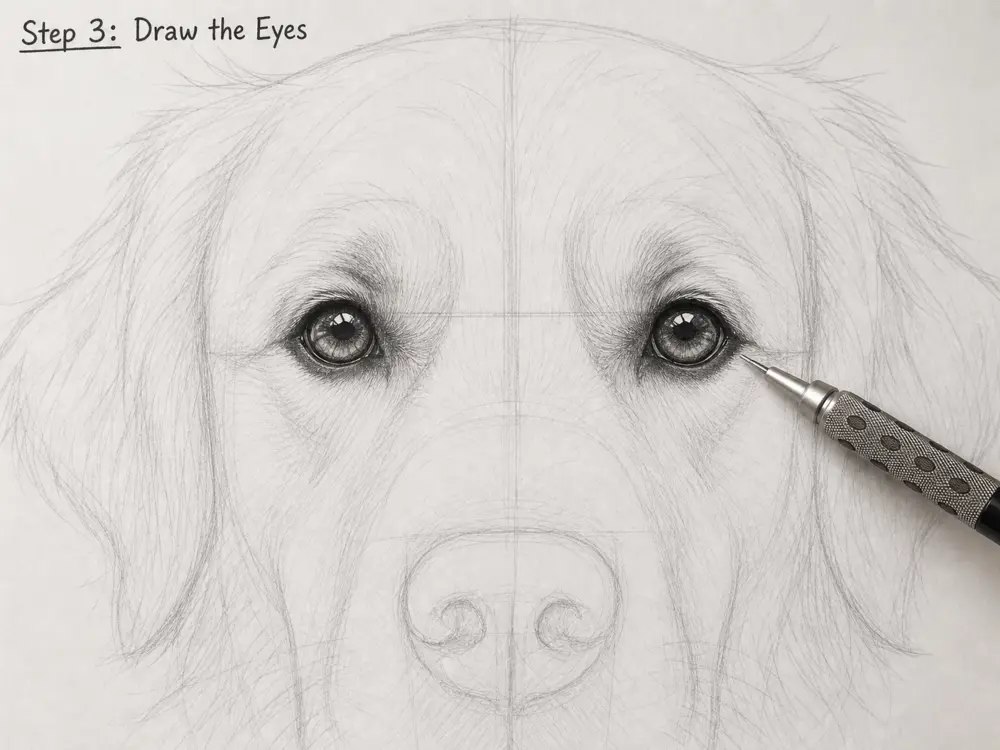
How to Draw a Dog Head
- Pupil size
- Reflections
- Eyelids
- Tear ducts
- Shadow depth
Realism Tip
Never fully outline the eyes with dark lines.
Instead:
- Build shadows gradually
- Use soft transitions
- Preserve highlights
How to Shade Eyes
- Shade the iris lightly
- Darken the pupil
- Leave reflected light white
- Add darker shadows near eyelids
- Blend softly
The tiny reflections inside the eyes make the drawing feel alive.
Step 4 – Drawing the Nose and Muzzle
The nose contains more texture than most beginners realize.

Structure of a Dog Nose
Observe:
- Nostrils
- Center groove
- Moist texture
- Tiny bumps
- Highlight reflections
Shading the Nose
Use:
- 8B pencil for darkest nostrils
- HB or 2B for midtones
- Kneaded eraser for highlights
Important Tip
Do not blend everything smooth. A dog nose has texture, so slight graininess improves realism.
Step 5 – Sketching the Ears
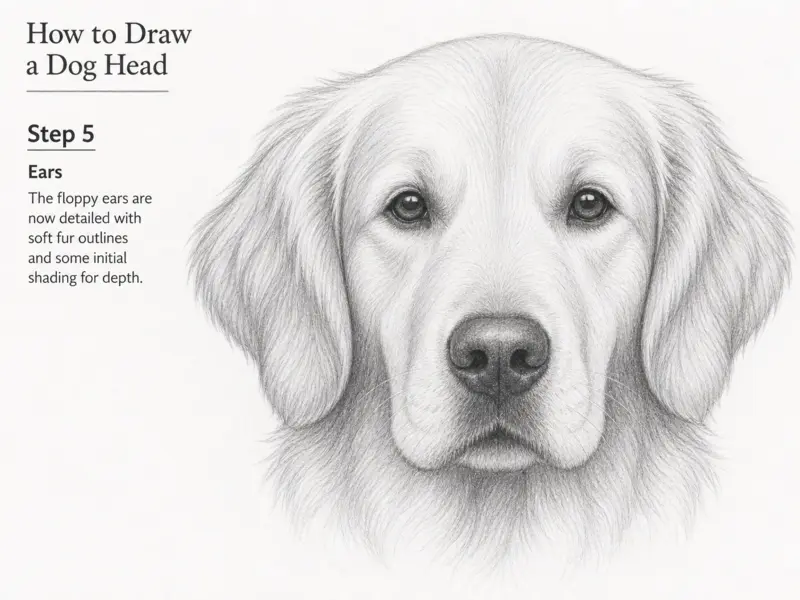
Different breeds have different ear shapes.
Examples:
- Floppy ears
- Upright ears
- Folded ears
- Long-haired ears
Study your reference carefully.
Drawing Realistic Ears
Pay attention to:
- Fold direction
- Thickness
- Light edges
- Inner shadows
- Fur growth
The ears should feel attached naturally to the skull.
Step 6 – Drawing the Neck and Fur Direction
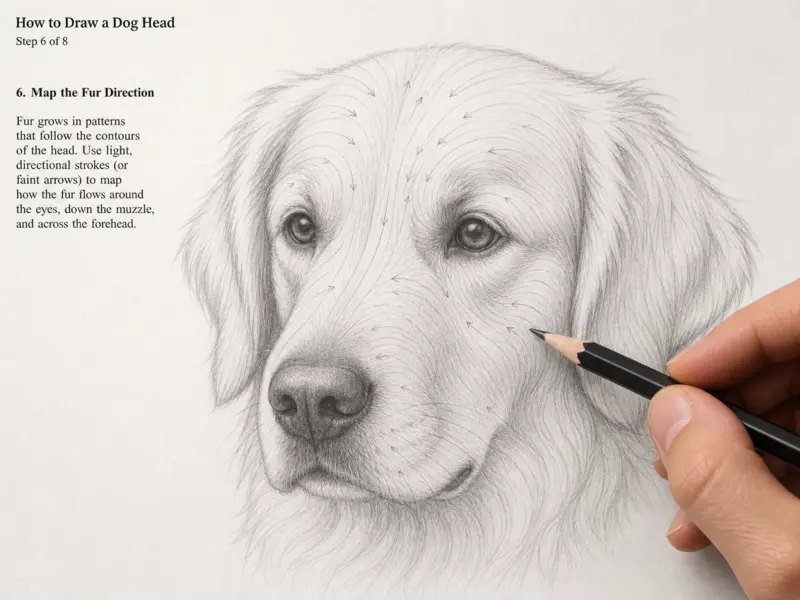
Before adding detailed fur, map the direction fur grows.
Fur Does Not Go Randomly
Fur follows anatomy.
Notice how it curves:
- Around the eyes
- Down the muzzle
- Along the cheeks
- Around the neck
Beginner Mistake
Many artists draw identical pencil strokes everywhere.
Instead:
- Change stroke length
- Change direction
- Vary pressure
This creates natural-looking fur texture.
Step 7 – Initial Shading Techniques
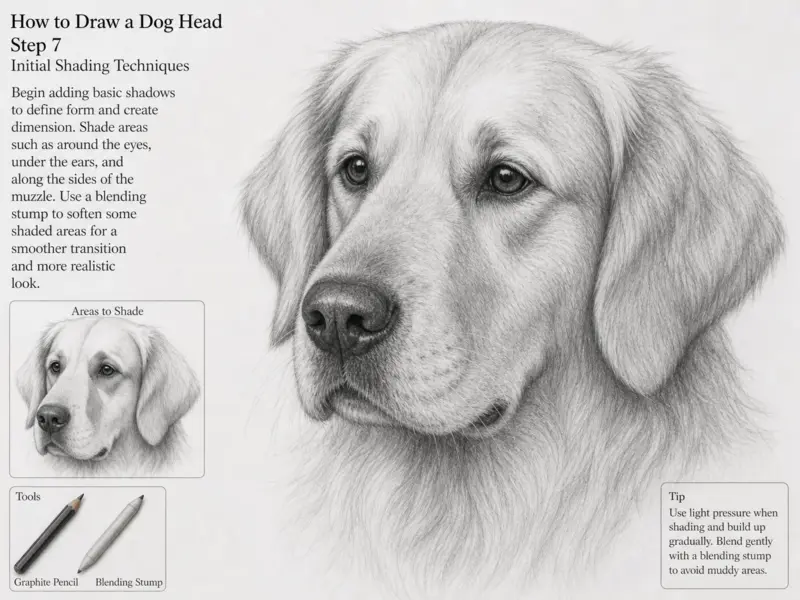
Now it’s time to build depth.
Best Shading Methods for Dog Drawings
Hatching
Parallel lines for controlled value.
Cross-Hatching
Layered lines for darker shadows.
Circular Shading
Soft graphite buildup for smooth transitions.
Blending
Use a blending stump carefully to soften graphite.
Step 8 – Creating Realistic Fur Texture
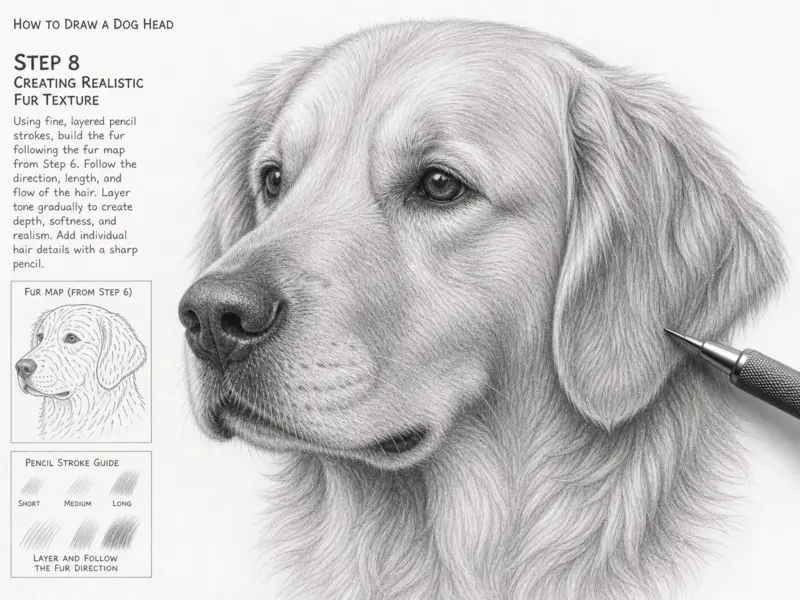
This is where the drawing starts looking alive.
How to Draw Fur Realistically
Use Layering
Start with:
- Light base tones
- Midtone fur strokes
- Dark overlapping strands
Fur Stroke Technique
Use:
- Fast tapered strokes
- Sharp pencils
- Varying lengths
Important Rule
Draw fur in the direction it grows. Random strokes instantly ruin realism.
Step 9 – Adding Depth and Contrast
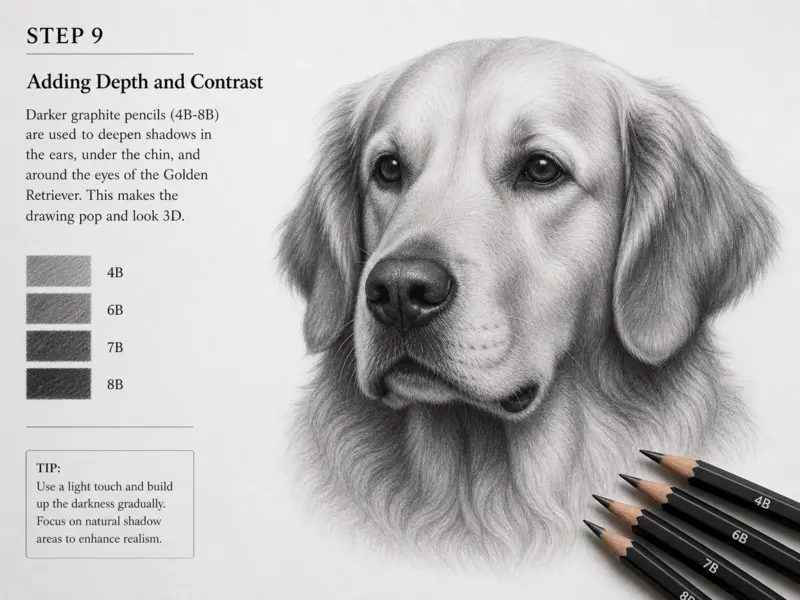
Contrast separates amateur drawings from realistic artwork.
Increase Dark Values
Darken:
- Eye corners
- Nose holes
- Ear interiors
- Under the chin
- Deep fur shadows
Increase Highlights
Lift graphite using:
- Kneaded eraser
- Precision eraser
Highlights create dimension and realism.
Step 10 – Final Highlights and Polishing
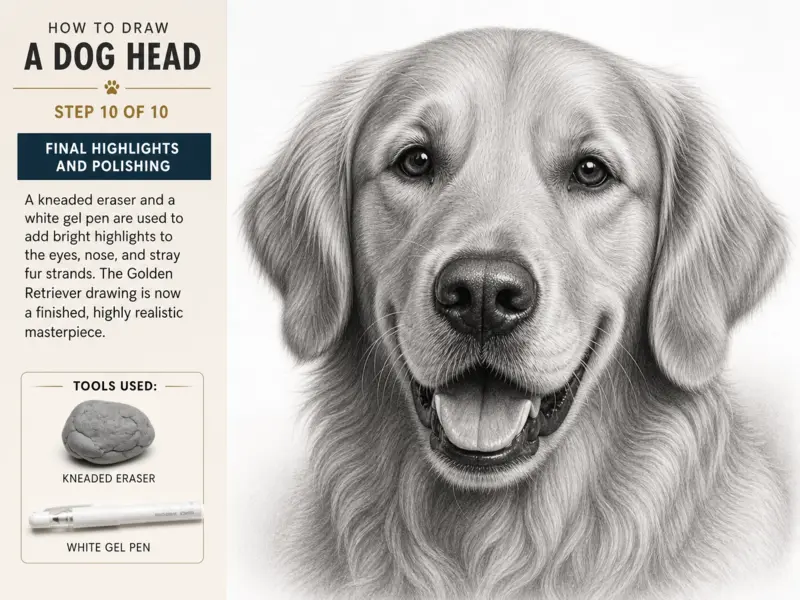
Now refine everything.
Final Checklist
- Smooth uneven shading
- Sharpen eye reflections
- Add stray fur strands
- Correct symmetry
- Strengthen focal areas
- Clean dirty edges
Take breaks and look at your drawing from a distance. Fresh eyes help you notice mistakes.
Common Mistakes to Avoid
1. Drawing Fur Too Early
Always build structure first.
2. Over-Blending
Too much blending removes texture.
3. Ignoring Anatomy
Understanding skull structure improves realism dramatically.
4. Uniform Pencil Strokes
Real fur varies in direction and length.
5. Flat Eyes
Eyes need:
- Highlights
- Contrast
- Reflections
- Soft transitions
How to Draw Different Dog Breeds
Different breeds require different approaches.
German Shepherd
- Strong muzzle
- Upright ears
- Thick fur
Labrador Retriever
- Softer face
- Short coat
- Rounded features
Husky
- Dense fur
- Sharp facial markings
- Bright eye contrast
Pug
- Wrinkles
- Flat muzzle
- Large eyes
Golden Retriever
- Long flowing fur
- Soft transitions
- Feathered ears
Pencil Recommendations for Dog Drawings
Best Pencil Grades
| Pencil | Purpose |
|---|---|
| HB | Sketching |
| 2B | General shading |
| 4B | Fur shadows |
| 6B | Dark contrast |
| 8B | Deep blacks |
Mechanical pencils work especially well for fine fur details.
Advanced Realism Tips
Use Multiple Layers
Professional artists build fur gradually over many layers.
Squint at Your Reference
This simplifies values and helps you see major shadows.
Work From General to Specific
Large shapes first. Tiny details later.
Use Negative Drawing
Sometimes it’s easier to draw the shadows around fur rather than the fur itself.
Frequently Asked Questions
Is drawing a dog head hard for beginners?
Not if you break it into simple steps. Construction shapes and proper proportions make the process manageable.
What is the easiest dog breed to draw?
Short-haired breeds like Labradors and Beagles are often easiest for beginners.
How long does it take to draw a realistic dog head?
Anywhere from 1–10 hours depending on detail level and experience.
What pencils are best for realistic dog drawings?
Graphite pencils ranging from HB to 8B work best.
How do you make dog fur look realistic?
Use layered strokes that follow natural fur direction and vary the pressure and length.
Should beginners use grids?
Yes. Grids help improve proportion accuracy.
Unique Pro Tips Most Tutorials Ignore
Most tutorials only teach copying outlines.
Professional-level realism comes from understanding:
- Fur direction maps
- Skull anatomy
- Value grouping
- Edge control
- Texture variation
- Lighting logic
These concepts dramatically improve your artwork faster than tracing alone.
Practice Exercise
Try drawing:
- A short-haired dog
- A fluffy dog
- A side-view dog head
- A puppy face
- A dog with dramatic lighting
Each variation improves different drawing skills.
Final Thoughts
Learning how to draw a dog head realistically takes patience, observation, and repetition. Focus first on structure and proportions before worrying about tiny details. The more reference photos you study, the better your understanding of canine anatomy, fur flow, and shading becomes.
Remember:
- Build from simple shapes
- Use layered shading
- Observe fur direction carefully
- Prioritize the eyes and nose
- Practice consistently
With time, you’ll be able to create realistic dog portraits full of life, personality, and depth.
“`json “`