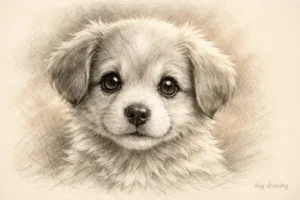
Dog Drawing: The Complete Step-by-Step Guide for Beginners, Kids, and Artists
If you want to learn animal drawing, dogs are the best starting point. Their body structure is straightforward — round head, simple body, four legs. You do not need any special talent to begin. You just need a pencil, some paper, and a little patience. Beginners usually run into the same issues. The head ends up too big. The legs look stiff or unnatural. The face has no real expression. Fur turns into a messy scribble. None of this means you are bad at drawing. It just means you have not broken the dog into its basic shapes yet.
This guide covers everything from simple beginner sketches to cartoon styles and realistic portraits.
You will learn:
- Easy dog drawing for beginners
- Cute cartoon dog styles
- Realistic dog portrait basics
- Simple shading and fur techniques
Why Dog Drawing Is a Good Starting Point
Dogs work well for beginners because their shapes are simple and forgiving. The head is basically a circle. The body is an oval. The legs are cylinders. If you can draw those three shapes, you already have the foundation of a dog sketch. What makes dogs especially useful for practice is that they have a lot of variety. Different breeds have different ear shapes, body sizes, face structures, and postures. That gives you endless material to work with without switching to a completely different subject.
Another advantage is that dogs are easy to observe. Most people have seen dogs in person, in videos, or in photos. You already have a mental picture of how a dog moves and sits. That familiarity helps when you are trying to get proportions right.
Before you start sketching, spend a minute looking at a real photo of a dog. Notice:
- How wide the head is compared to the body
- Where the ears sit on the skull
- How the legs connect to the torso
- How the tail curves
That quick observation makes a noticeable difference in your sketch.
Essential Tools for Dog Drawing
You do not need much to get started.
Traditional Drawing Tools
For most beginners, a basic pencil and a sketchbook are enough. Here is what actually gets used:
- HB or 2B pencil for initial shapes and light lines
- 4B or 6B pencil for darker shading and fur texture
- A good eraser — kneaded erasers work better than standard ones
- A sketchbook with at least 80gsm paper so pencil does not bleed through
- A blending stump if you want smoother shading
- Fineliner or marker for clean outlines once the sketch is done
Charcoal is another option for bolder, high-contrast work. It smudges easily, which is useful for soft fur effects.
Digital Drawing Tools
If you prefer digital:
- A drawing tablet with a stylus gives the most control
- Procreate on iPad is the most popular option for beginners
- Clip Studio Paint works well for both sketching and detailed linework
- Krita is free and capable if you are on a budget
- Adobe Photoshop is powerful but has a steeper learning curve
Most people start with pencil and paper. It is slower to correct mistakes, but that actually builds better habits because you think more carefully before each line.
Understanding Basic Dog Anatomy for Drawing
You do not need to study veterinary anatomy to draw dogs well. But understanding a few key points makes a real difference.
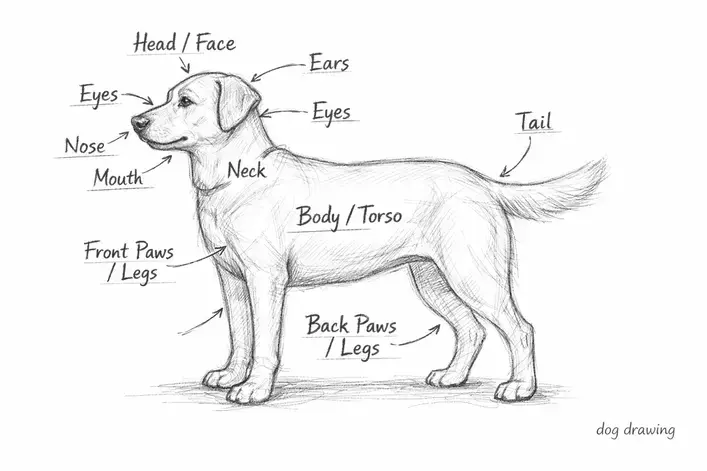
Basic Dog Body Structure
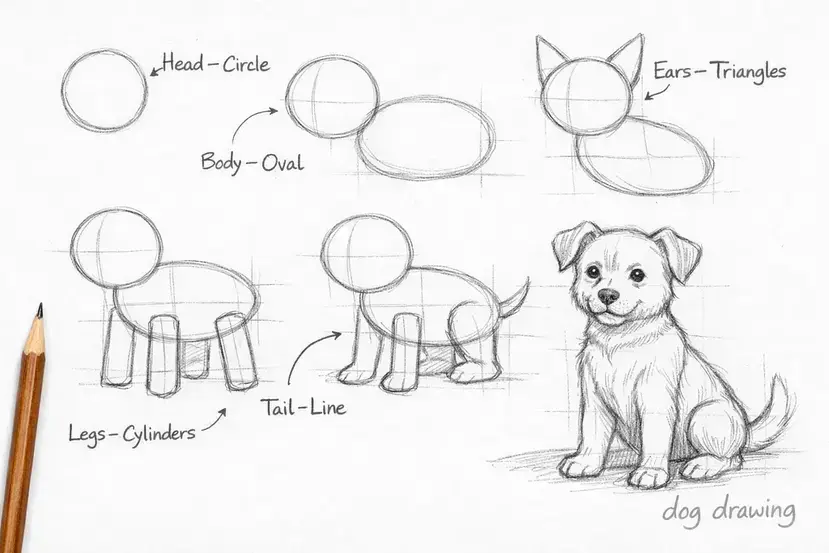
Think of the dog as a collection of shapes before you think of it as an animal:
- Head: circle or slightly flattened oval
- Muzzle: smaller box or cylinder attached to the front of the head
- Body: larger oval, slightly elongated
- Legs: four cylinders, with the front legs straighter and the back legs having a clear bend at the knee
- Tail: a simple curved line, varying by breed
When you sketch these shapes first and lightly, the proportions stay more consistent. Beginners who skip this step and draw the outline directly tend to get features in the wrong place.
Key Dog Features to Pay Attention To
- Eyes: positioned roughly in the middle of the head, not at the top
- Ears: attached to the sides or top of the skull depending on breed
- Nose: at the end of the muzzle, not floating in the middle of the face
- Paws: each paw has visible toes and a pad underneath
- Tail: the starting point of the tail is above the back end of the body
Lightly sketching a horizontal guideline across the middle of the head helps you place the eyes correctly. That one habit fixes a very common beginner mistake.
Easy Dog Drawing Step-by-Step (Beginner Tutorial)
Work through these steps with light pencil pressure so you can adjust as you go.
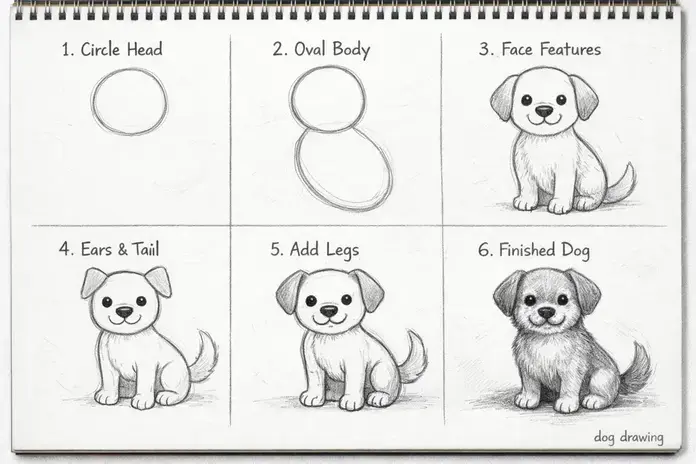
Step 1: Draw a Circle for the Head
Draw a loose circle. It does not need to be perfect. This is just a guide.
Step 2: Sketch the Body with an Oval
Below and slightly behind the head, draw a larger oval for the body. The two shapes should overlap slightly at the neck area.
Step 3: Add Ears and Tail
Depending on the breed you are drawing, add triangles for upright ears or drooping shapes for floppy ears. Add a curved line for the tail at the back of the body oval.
Step 4: Draw Eyes and Nose
Use your horizontal guideline to place the eyes evenly on either side of the center. Add a simple nose shape at the front of the muzzle.
Step 5: Sketch the Legs
Draw four cylinders for the legs. Front legs drop straight down. Back legs have a bend at the knee. Keep them roughly equal in thickness.
Step 6: Refine the Outline
Connect all your shapes with a smooth outline. Round off the corners, define the neck, and clean up any overlapping lines.
Step 7: Add Shading
Shade the underside of the body, the insides of the legs, and the area under the ears. Use short strokes that follow the direction the fur would grow.
The biggest mistake at this stage is rushing into detail before the basic shapes are solid. Get the proportions right first, then add fur and facial detail.
How to Draw a Cute Dog (Cartoon Style)
Cartoon dogs are simpler to draw than realistic ones because you are not trying to be accurate — you are trying to be expressive.
The main difference is proportion. Cartoon dogs have:
- Larger heads relative to the body
- Bigger eyes, usually with visible pupils and a highlight dot
- Smaller, rounder bodies
- Shorter, stubbier legs
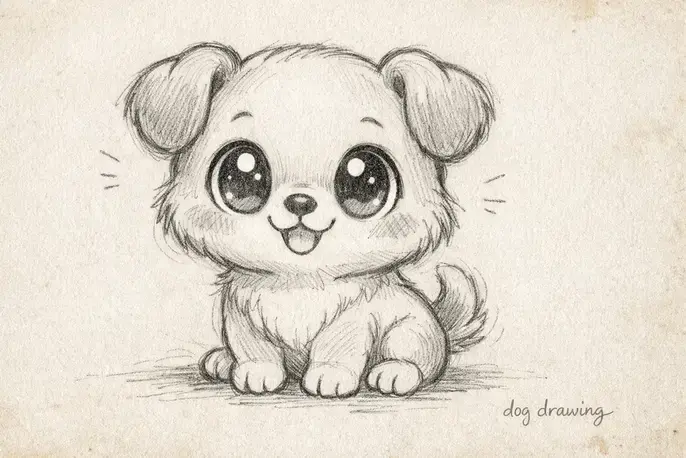
Start with an even rounder circle for the head than you would use for a realistic dog. Place the eyes lower on the face than you normally would. This gives the character a younger, more innocent look. The nose can be simplified to a small oval or triangle. The mouth can be a simple curved line. You do not need nostrils, wrinkles, or fur detail. For the body, keep it small and round. The legs can be simple rounded shapes with no visible joints.
A few style variations:
- Cartoon style: clean outlines, exaggerated features, simple shading
- Kawaii style: very large eyes, blush marks on cheeks, minimal lines
- Chibi style: oversized head, tiny body, almost no neck
Adding small details makes a big difference — inner ear color, a small tongue, a collar, or a wagging tail line. These touches take seconds but add a lot of personality.
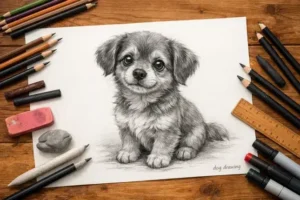
How to Draw a Realistic Dog
Realistic dog drawing is slower and requires more observation, but the process is the same — shapes first, detail second.
Using Reference Photos
Working from a reference photo is not cheating. Professional artists do it constantly. A photo lets you check proportions, see how the fur flows, and notice details that are easy to miss from memory. Use a photo where the lighting is clear. Strong side lighting shows fur texture and muscle structure well. Flat frontal lighting flattens everything and makes it harder to see depth.
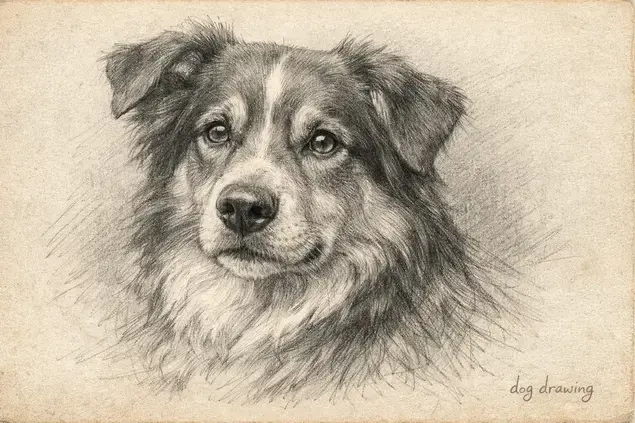
Shading and Fur Texture
Realistic dog fur is drawn with short, directional strokes. The direction of each stroke should follow the direction the fur actually grows on that part of the body.
General rules:
- Fur on the back flows downward and slightly backward
- Fur on the chest flows downward
- Fur around the face radiates outward from the nose
- Darker areas need more layers of overlapping strokes
- Lighter areas get fewer, lighter strokes
For the eyes, add a small white highlight dot and keep the pupil dark. The nose should also have a small highlight to look wet and solid. Blending with a stump or your fingertip can soften areas like the belly or inner ears where the fur is shorter and softer.
How to Draw Different Dog Breeds
Each breed has specific features that make it recognizable. Getting those details right is what separates a generic dog sketch from a breed portrait.
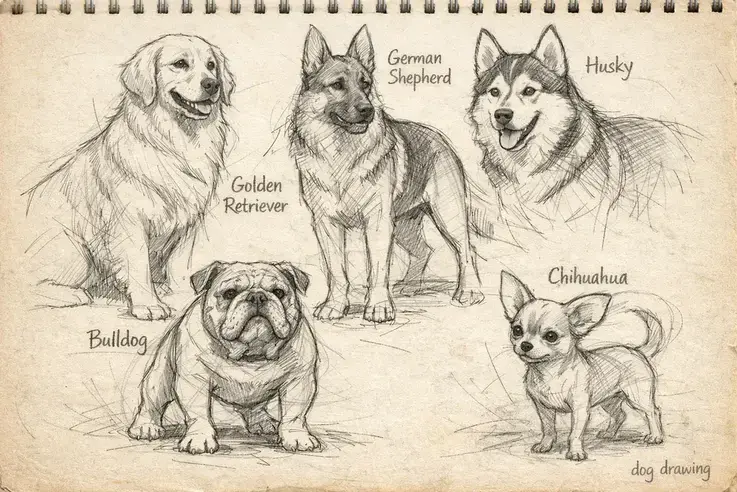
Golden Retriever
The key features are the long, wavy fur especially around the ears and tail, the broad forehead, and the soft, friendly eye shape. The body is solid and well-proportioned. Focus on getting the ear fur right — it hangs down and has clear waves.
German Shepherd
The ears are upright and pointed. The face is longer and more angular than other breeds. The back slopes slightly downward from shoulders to hips. The coat has two layers — a shorter undercoat and a longer outer coat.
Siberian Husky
The most important details are the facial markings and the eye color. Many Huskies have blue eyes or one blue and one brown eye. The fur pattern around the face is distinctive — lighter on the muzzle and inner face, darker on top. The tail curls over the back.
Bulldog
Bulldogs have a very different structure from most breeds. The face is pushed in with visible skin folds. The body is low and wide. The legs are short and slightly bowed. The wrinkles on the face are the most important detail to capture.
Chihuahua
Very large ears relative to the head size. Large, round eyes. Small, compact body. The proportions are almost already cartoon-like, so Chihuahuas translate well to both realistic and cartoon styles.
How to Draw Specific Dog Parts
Practicing individual features separately is one of the most effective ways to improve. When you spend a whole session drawing only dog eyes, you get better at dog eyes much faster than if you draw a full dog every time.
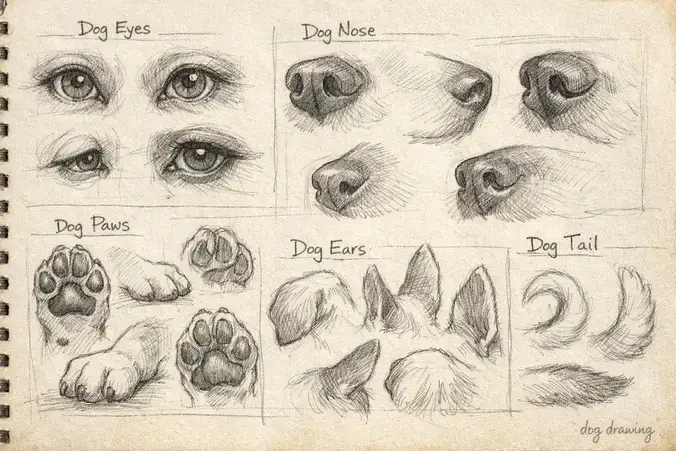
Dog Face Drawing
The face is built around the muzzle. The muzzle comes forward from the skull, and the nose sits at the very tip. Draw the muzzle as a box shape first, then soften the edges. The stop — the indent between the forehead and the muzzle — varies by breed and is an important feature to observe.
Dog Eyes Drawing
Draw the eye socket area first, then place the eye shape within it. Most dog eyes are almond-shaped when looking straight ahead. Add the iris, then the pupil inside it. Add a small white dot for the highlight. The area around the eye, including the eyelid and brow area, carries a lot of expression.
Dog Nose Drawing
The nose is roughly triangular when viewed from the front, with a center ridge dividing two nostrils. It curves downward at the sides. Add a small highlight at the top to make it look moist.
Dog Paws Drawing
Each paw has four visible toes and a central pad. Sketch the overall oval shape of the paw first, then divide it into toes. The nails are short and curve downward. When the dog is sitting, the front paws face forward. When lying down, they can point in different directions.
Dog Ears Drawing
Ear shapes vary enormously between breeds. Before drawing ears, look at a reference for the specific breed. Floppy ears hang from the side of the skull and have weight to them — the top curves outward. Upright ears are triangular and have visible interior structure.
Common Dog Drawing Mistakes Beginners Make
Knowing what tends to go wrong helps you catch problems before they get worse. Eyes placed too high on the head is probably the most common mistake. Beginners instinctively put the eyes in the upper half of the face, but on most dogs, the eyes sit at or slightly above the midpoint.
Legs that are too thin or too uniform in width look unnatural. Legs are thicker at the top where they connect to the body and taper slightly toward the paw. The joints also create visible bumps in the outline. Fur drawn as random scribbles has no direction or structure. Real fur flows in consistent directions. Even in a quick sketch, using short strokes that point in roughly the same direction reads as fur. Random marks read as texture but not fur.
Starting with detail instead of structure is the reason a lot of sketches fall apart. If the underlying proportions are off, no amount of detail work will fix it. Always sort out the basic shapes before committing to any fine lines. Copying another drawing instead of using a photo reference. Copying drawings copies mistakes. Original photos show you how a real dog actually looks.
Dog Drawing Practice Exercises (Fast Skill Growth)
Short, focused practice sessions work better than occasional long ones.
5-Minute Puppy Sketches
Set a five-minute timer and draw a puppy from start to finish. The goal is not a finished drawing — the goal is making decisions quickly. This builds confidence and trains your eye to see shapes fast.
Gesture Drawing of Dogs
Use a site like Line of Action or similar to practice dog gestures. Set the timer to 30 or 60 seconds per pose. Draw only the basic line of action and major shapes. This trains you to capture movement and posture without getting caught up in detail. You can use Line of Action for free timed gesture drawing practice.
Shading Practice
Pick one small area — the ear, the nose, one paw — and spend 10 minutes shading it carefully. Focus on stroke direction, pressure variation, and edge softness. This kind of isolated practice improves shading faster than shading a full drawing every time.
Drawing from Photos
Find a clear photo of a dog and draw it as accurately as you can. When you finish, put your drawing next to the photo and look for differences. Note what is off and why. This comparison process is where most of the learning happens.
Breed Comparison Sketches
Draw a Labrador and a Chihuahua side by side on the same page. Keeping them at the same scale forces you to think carefully about proportional differences. This is a practical way to study breed-specific features.
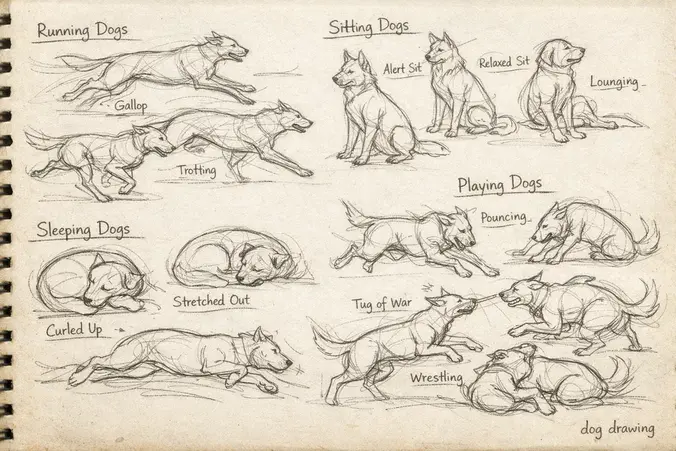
Dog Drawing Ideas to Practice
Switching between different poses and styles keeps practice from getting repetitive.
Sleeping Puppy Drawing
A sleeping dog is a good subject because the pose is relaxed and slow to change. The body is more compact, the paws are folded or extended, and the face is relaxed. Focus on capturing the soft, curved quality of the shapes.
Running Dog Sketch
This is harder because of the dynamic pose, but gesture drawing helps. The key is the leg extension — front legs reach forward while back legs push backward. The spine also curves during a full run. Use photo references taken at high shutter speed.
Dog Sitting Drawing
A sitting dog is one of the most common poses and worth mastering. The back legs fold under the body in a specific way, and the front legs are straight. The tail wraps around the side. Pay attention to where the weight is — it sits on the haunches.
Dog Playing Drawing
Playing poses involve a lot of movement and expression. The play bow — front legs down, back end up — is a recognizable pose that is fun to draw. It also requires you to think carefully about foreshortening.
Dog Portrait Drawing
A close-up portrait focused on the face is one of the best exercises for realism. Working at larger scale forces you to pay attention to small details — the texture around the eyes, the individual hairs on the muzzle, the depth of the nose.
Cartoon Dog Doodle
No reference needed. Just draw whatever comes to mind. Cartoon doodling is useful because it builds drawing fluency and helps you develop a personal style over time.
Printable Dog Drawing References
Reference sheets are useful when you are learning a new breed or trying to understand proportions. A good reference shows the dog from at least two angles — front and side — at the same scale. When using a reference for tracing or copying practice, focus on understanding the structure rather than just replicating the lines. Ask yourself why the lines go where they do. What shape is underneath? How does this part connect to the next?
Dog drawing templates that break the body down into basic shapes are especially useful for beginners. They make the construction process visible, which is harder to see in a finished drawing. For breed-specific references, photography sites and kennel club websites usually have clean, well-lit photos taken from standard angles. These work better for drawing practice than casual phone photos, which tend to have perspective distortion.
How Long Does It Take to Learn Dog Drawing?
There is no fixed timeline, but here is a rough breakdown of what to expect at each stage.
Beginner Stage
At this stage the focus is on getting the basic shapes right — head, body, legs, ears, tail. Proportions will be off at first and that is normal. Most people start seeing real improvement within a few weeks of regular practice, meaning a few sessions per week.
Intermediate Stage
Once proportions feel more natural, the focus shifts to facial detail, fur texture, and shading. Sketches start to look more three-dimensional. Reaching this stage consistently takes several months for most people who practice a few times per week.
Advanced Stage
At this level, different breeds are recognizable, fur texture looks convincing, and poses with foreshortening or unusual angles are manageable. Getting here takes sustained practice over a year or more, but the jump from beginner to intermediate happens faster than most people expect.
The honest answer is that improvement is mostly a function of how often you practice and how deliberately you observe. Quantity matters, but quality of attention matters more.
Tips to Improve Your Dog Drawings Faster
Observe Before You Draw
Spend 60 seconds looking at your reference before you touch the pencil. Identify the major shapes. Notice the proportions. Decide where you will start. This reduces the number of mistakes you make because you are working from a clearer mental image.
Study Anatomy Selectively
You do not need to learn every bone and muscle. Focus on the parts that affect the surface — the shoulder blades, the hip bones, the knee joint on the back leg, the skull shape. These are the places where anatomy directly affects what you draw.
Use a Timer
Drawing without a time limit often leads to overworking a sketch. Setting a timer — even just 15 minutes — forces you to make decisions and commit to lines. It also makes practice feel more manageable when you are short on time.
Copy First, Create Later
Using photo references and even copying other artists’ work is a legitimate way to build skills. It trains your hand and eye without requiring you to solve every problem from scratch. Once the foundational skills are solid, original work becomes much easier.
Try Different Styles
Drawing the same dog in a realistic style and then as a cartoon forces you to think about which features are essential and which are detail. That kind of analysis develops a stronger understanding of the subject than just repeating one style.
Frequently Asked Questions About Dog Drawing
How do you draw a dog step by step?
Start with a circle for the head and an oval for the body. Add ear shapes, a muzzle, and a tail. Sketch the four legs as simple cylinders. Refine the outline to connect all the shapes smoothly, then add facial features and shading.
What is the easiest dog to draw?
Cartoon or chibi-style dogs are the easiest because the shapes are simple and accuracy matters less. Among realistic breeds, Labradors and Beagles are straightforward because their coat is short and their build is uncomplicated.
How do you draw a realistic dog?
Work from a clear reference photo. Build the sketch on basic shapes first. Pay attention to fur direction when shading. Focus on the eyes and nose — getting those two features right makes the whole drawing look more convincing.
How do beginners draw dogs?
Start with the shapes, not the outline. Draw lightly so you can adjust. Practice individual features separately before combining them. Use reference photos rather than drawing from memory.
How can kids draw a dog easily?
A simple cartoon dog is the best starting point. Large circle for the head, small oval for the body, two dot eyes, a triangle nose, and two floppy ear shapes. Add a curved tail and four short legs. Kids pick this up quickly because the shapes are familiar.
What tools are best for dog drawing?
An HB pencil and a sketchbook are enough for most beginner practice. As you progress, adding a softer pencil (4B or 6B) for shading and a kneaded eraser for lifting highlights makes a noticeable difference.
Final Thoughts
Dog drawing is a skill that builds gradually. The first sketches will not look the way you want them to, and that is fine. The gap between what you can see and what you can draw closes over time with regular practice. The most useful thing you can do right now is draw one dog — any dog, any style, any level of detail — and then draw another one tomorrow. That consistency is what actually builds the skill, not any single technique or tip. Keep a sketchbook. Date your drawings. Looking back at where you started is a reliable way to see that the practice is working, even when day-to-day progress is hard to notice.