Drawing Sunflowers: The Complete Step-by-Step Guide for All Skill Levels
Most beginners fail at drawing sunflowers for one reason. They skip straight to the petals without understanding what’s underneath. The result? Stiff petals, a flat center, and a drawing that looks nothing like a real sunflower.
Sunflower Anatomy: Know It Before You Draw It
A sunflower has three main zones. Each zone behaves differently — different shapes, different textures, different shading rules. Treat them the same and your drawing will look flat. Understand each one and your drawing will look alive.
Zone 1: The Disc (Center)
This is the round, dark center of the sunflower. It’s not flat — it’s dome-shaped, slightly convex. It’s packed with tiny florets arranged in a tight spiral pattern called a Fibonacci spiral. This is the most complex part of the flower to draw, but also the most impressive when done right.
Zone 2: The Ray Florets (Petals)
These are the long yellow petals radiating outward from the disc. Each petal is slightly twisted, wrinkled at the base, and tapered at the tip. They overlap at the base and spread out toward the edges. Real petals are not perfectly symmetrical — and that slight irregularity is what makes a drawing look natural.
Zone 3: The Stem and Leaves
The stem is thick and slightly hairy. It curves gently under the weight of the flower head. The leaves are large, rough-edged, and shaped like wide hearts. They connect to the stem with a short stalk and have visible veins running through them.
Artist’s note: Before drawing a single line, look at a real sunflower photo. Study where the petals attach to the disc. Notice how some petals point forward and some tilt back. That three-dimensional quality is what you’re trying to capture on a flat page.
How to Sketch a Sunflower Step by Step
Start light. Everything at this stage is just a guide — it will either be shaded over or erased. Use your 2H pencil throughout this entire phase.
Step 1: Draw the Flower Head Circle
Draw a circle in the upper-center area of your paper. Make it about 3–4 inches in diameter for a standard sketchbook page. Don’t press hard — this is a guide, not a final line. Draw it freehand. A slightly imperfect circle looks more natural than a ruler-perfect one.
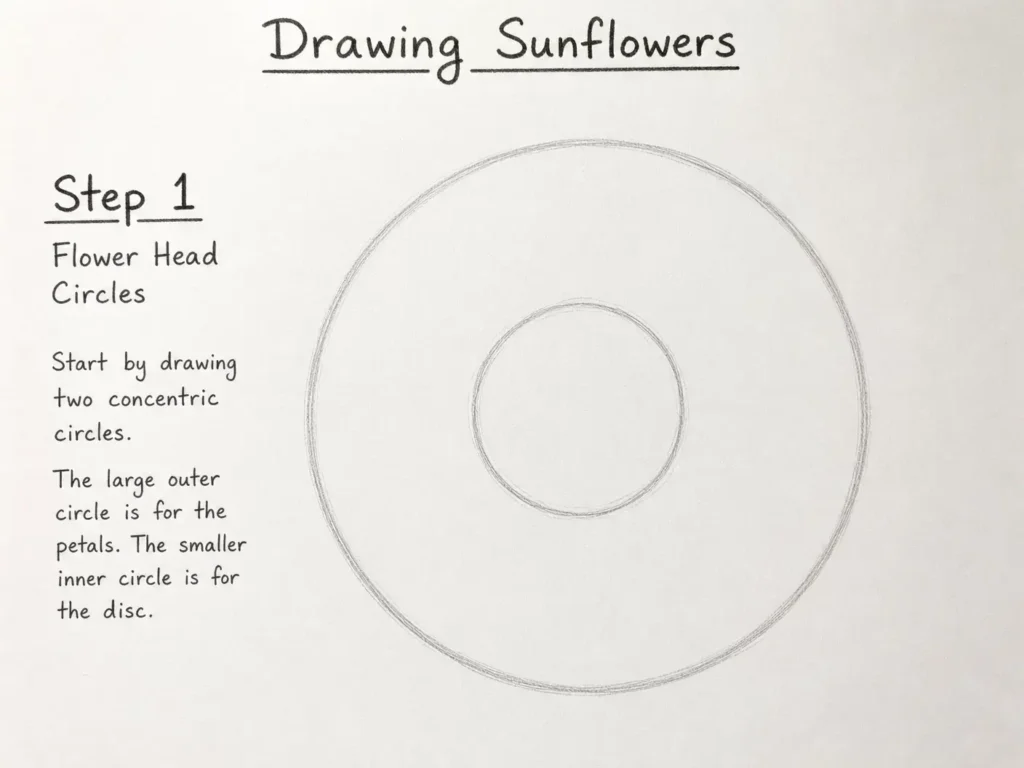
Inside that circle, draw a smaller circle. This inner circle will become the disc (the center). Make it roughly one-third the size of the outer circle. For a 4-inch flower head, the disc circle should be about 1.5 inches across.
Step 2: Mark the Petal Positions
Draw light lines radiating outward from the center of your disc circle — like the spokes of a wheel. Space them roughly evenly. These lines show you where each petal’s center axis sits. Aim for 12–16 spokes for a realistic sunflower petal count.
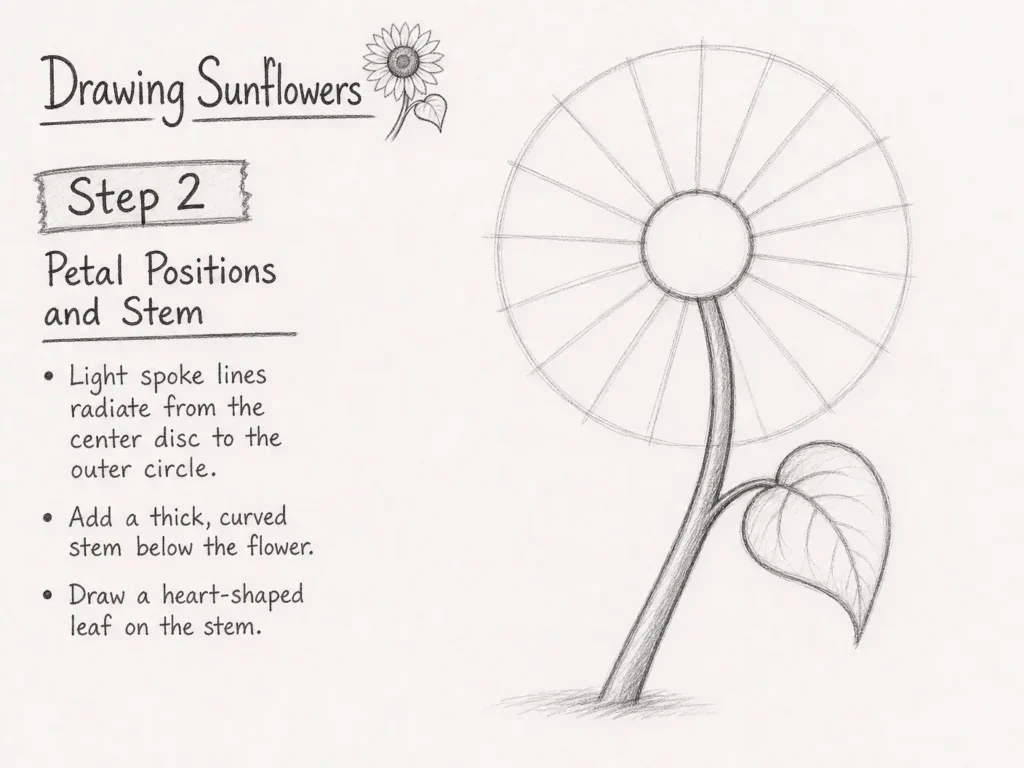
Now draw a second ring of spokes between the first ones. These will be your second layer of petals. Real sunflowers have two overlapping rings of petals — one in front, one slightly behind. Skipping this second layer is why many beginner sunflower drawings look thin.
Step 3: Draw the Ray Florets (Petals)

Along each spoke, draw a long, slightly tapered petal shape. Each petal should:
- Start narrow at the disc and widen toward the middle
- Taper back to a rounded or slightly pointed tip
- Have slightly uneven edges — not perfectly smooth
- Curve very slightly to the left or right of its spoke line
Draw the front layer of petals first. Then draw the back layer between them, slightly shorter and peeking out from behind. Where petals overlap, the back petals should be partially hidden by the front ones.
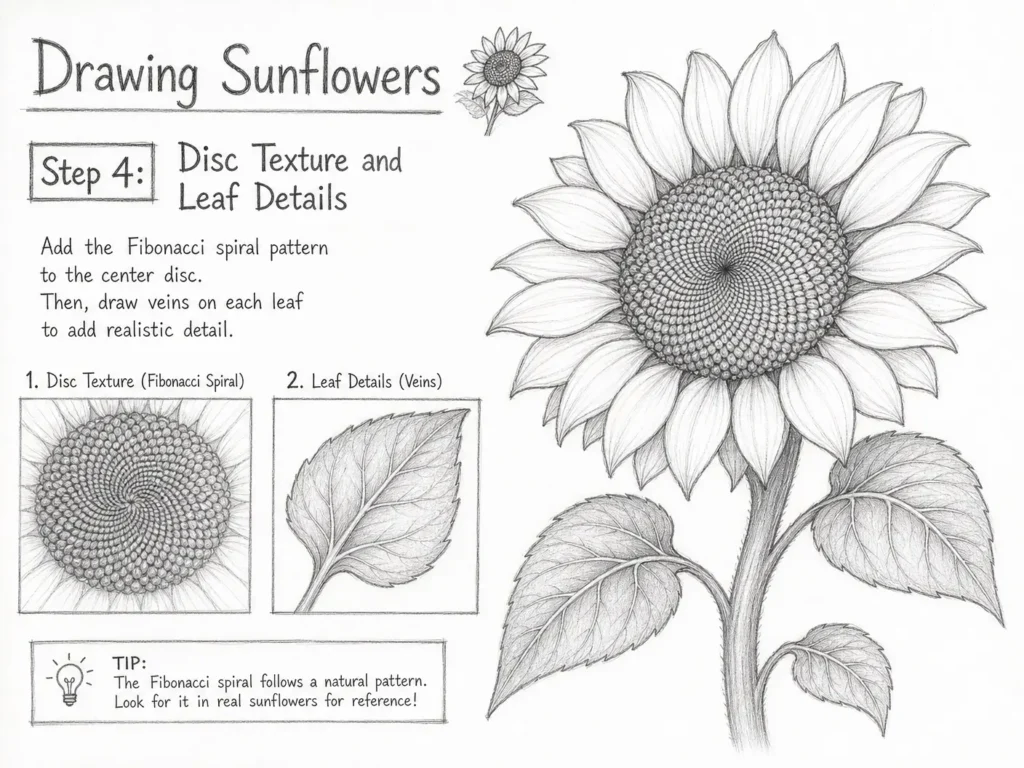
Step 4: Sketch the Disc Details
Inside the disc circle, draw a very light spiral pattern. This represents the Fibonacci spiral arrangement of the disc florets. You don’t need to draw it perfectly — just a loose suggestion of the spiral direction. This will guide your shading and texture work later.
Step 5: Add the Stem and Leaves
Draw two slightly curved parallel lines downward from the base of the flower head. The stem should be thick — about as wide as your pencil tip when pressed at normal pressure. Add a gentle curve to it; a completely straight stem looks unnatural.
Draw one or two large leaves branching from the stem. Each leaf is roughly heart-shaped or ovate, with a pointed tip and a wavy, slightly serrated edge. Add a central vein running from base to tip, with smaller veins branching off at angles.
Step 6: Clean Up the Sketch
Use your kneaded eraser to lightly lift the sketch lines. Don’t erase completely — just reduce them to a faint ghost. You want the lines visible enough to guide your shading, but light enough that they won’t show through your final marks.
Shading the Petals: Creating Real Depth
This is where the drawing transforms. Good shading is what separates a flat sketch from a drawing that looks three-dimensional. Work in layers — always build up gradually from light to dark.
Basic Petal Shading (H and HB Pencils)
Pick up your H pencil. Look at each petal and find its lightest area — usually the center of the petal face, closest to the light source. Leave this area very light.
Now shade from the edges toward the center using long, smooth strokes that follow the length of the petal. Apply slightly more pressure toward the petal edges and at the base where it meets the disc. This creates the illusion that the center of the petal catches the light while the edges fall into shadow.
Switch to HB. Deepen the shading at the base of each petal, where it tucks under the disc. This base area should be noticeably darker than the rest of the petal — the disc casts a shadow there.
Petal Fold and Wrinkle Details
Real petals are not smooth. They have a central ridge running down their length, and slight creases or folds along the sides. To draw these:
- Use your HB pencil to draw a very light line down the center of each petal. This is the midrib — the main vein of the petal.
- Add a few curved shadow lines on either side of it, following the curve of the petal surface.
- Use your blending stump to smooth out the shading on the broad flat surfaces of each petal, while leaving the crease lines slightly sharper.
Add the darkest petal shadows with a 2B pencil. Focus on: the gaps between overlapping petals, the area where petals attach to the disc, and any deep fold in the petal surface. These dark accents give the drawing its sense of depth.
Shading the Back-Layer Petals
The back-layer petals (the ones peeking out between the front petals) should always be slightly darker overall. They are in shadow compared to the front-facing petals. Use HB for their base tone instead of H, and shade them with slightly heavier pressure throughout.
Drawing the Disc Florets (The Center Texture)
This is the part most tutorials rush through. Getting the disc right is what makes a sunflower drawing look truly finished.
Understanding the Structure
The disc is made of hundreds of tiny tube-shaped florets packed together. They arrange themselves in two sets of spirals — one going clockwise, one counterclockwise. The result is a complex, almost mathematical pattern that looks dense and slightly bumpy.
How to Draw It in 3 Steps
Step 1 — Establish the base tone. Fill the entire disc area with a medium HB shading. Use small circular strokes rather than straight lines. This creates a softer base texture. The disc should already look darker than the petals at this stage.
Step 2 — Draw the spiral rows. Using a sharpened HB pencil, draw small curved comma-shapes following the spiral direction you sketched earlier. These comma-shapes represent the individual florets. Work in one spiral direction first, spacing them evenly. Then add the second set of spirals crossing over them. The two sets of spirals crossing each other create the characteristic diamond-shaped cells of the disc.
Step 3 — Add light and shadow to each cell. Each little diamond cell in the disc has a tiny raised floret in the center. Use a sharp 2B pencil to add a small dark accent at the bottom of each cell, and leave the top slightly lighter. Highlight the raised florets by gently lifting pencil tone with a kneaded eraser shaped to a fine tip. This gives the disc its bumpy, textured look.
The outer edge of the disc — where it meets the base of the petals — should be the darkest area of the entire disc. Use 4B here to push those shadows deep.
Leaves, Stem, and Final Details
Shading the Stem
The stem has a cylindrical shape. That means one side catches light and the other falls into shadow. Shade one side of the stem with HB, gradually lightening toward the opposite edge. Leave a thin strip of lighter tone on the lit side. Use 2B along the very darkest edge of the stem.
Add a few short, fine lines across the stem surface using HB — these suggest the fine hairs that cover a real sunflower stem. Don’t overdo it. Ten to fifteen scattered lines are enough.
Shading the Leaves
Leaves have a rough, matte surface. Unlike petals, they don’t have a shine. Shade them with HB using side-to-side strokes that follow the shape of the leaf. Apply heavier pressure on the underside of the leaf and lighter pressure on the top surface.
Reinforce the central vein and the branching veins with a sharp H pencil. Shade slightly darker on both sides of each vein — veins sit slightly raised on the leaf surface, so the areas next to them fall into slight shadow.
Use a 2B pencil at the base of the leaf where it connects to the stem. This junction point is always in deep shadow.
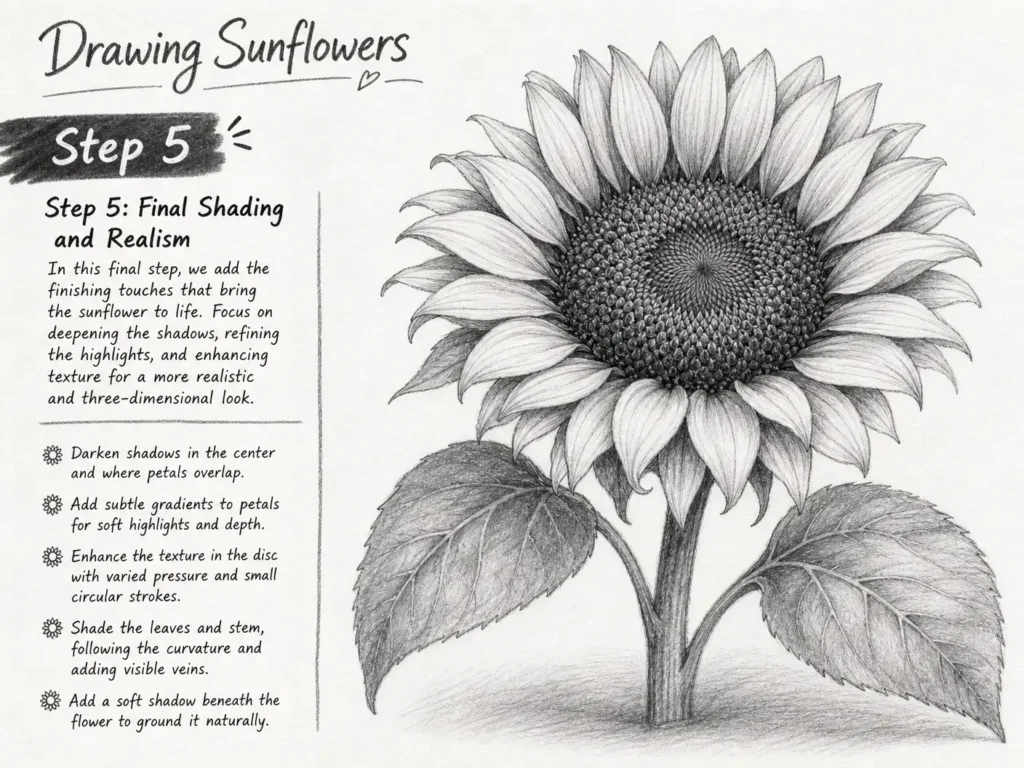
Final Review and Refining
Step back and look at the whole drawing. Ask yourself:
- Is the disc significantly darker than the petals? It should be.
- Do the back-layer petals look slightly darker than the front-layer petals?
- Is there a clear light source? Petals should be lightest on one side and darker on the opposite side.
- Are the darkest darks truly dark? Push them further with 4B if needed.
Use your kneaded eraser to lift any highlights — the tip of the front petals, the brightest part of the disc edge, and the lit side of the stem. These small bright points complete the illusion of light hitting the flower.
The Technique Most Sunflower Tutorials Miss
Almost every sunflower tutorial focuses on drawing from a flat, front-facing view. But real sunflowers rarely face you directly. The flower head nods forward slightly on its stem, tilted at an angle. Drawing a slightly tilted sunflower is dramatically more interesting — and it’s actually easier to shade because the three-dimensional shape becomes much more obvious.
How to Draw a Tilted Sunflower
Change the disc circle to an ellipse. Instead of a perfect circle for the flower head, draw a slightly flattened ellipse. This immediately suggests that you’re looking at the flower from a slightly elevated angle. The more flattened the ellipse, the more extreme the tilt.
Shorten the petals on the far side. The petals at the top of the ellipse (the far side) should appear shorter — not because they are shorter, but because perspective foreshortens them. Draw them about 20–30% shorter than the petals on the near side.
Make the near-side petals slightly wider. The petals closest to the viewer (at the bottom of the ellipse) face you more directly. They should appear slightly wider and less tapered than the far-side petals.
Curve the stem toward the viewer. The stem should curve gently toward you at the base, rather than dropping perfectly straight down. This reinforces the sense that the flower is nodding forward.
This single change — drawing the flower at a tilt — will make your sunflower drawing stand out from 90% of sunflower art online. It adds perspective, depth, and realism that a flat front-facing view can never achieve.
Bonus technique — vary your petal lengths. Real sunflowers don’t have perfectly uniform petals. Some are longer, some shorter, some slightly twisted. After you draw your basic petals, go back and vary the length of three or four of them slightly. Make one or two petals curl at the tip. These small imperfections are what make a drawing look alive rather than mechanical.
Frequently Asked Questions About Drawing Sunflowers
Q: How do I draw a sunflower if I’m a complete beginner?
Start with the basic circle-and-spoke method described in Section 3 of this guide. Use only a 2H pencil for the entire sketch before adding any shading. Don’t try to draw all the petals at once — draw one, then use it as a template to judge the size and shape of the next one. Work slowly and focus on the structure before worrying about detail.
Q: What’s the best way to draw sunflower petals so they look realistic?
Three things make sunflower petals look realistic: irregular edges (not perfectly smooth), a visible midrib (central vein line) running down the length of each petal, and variation in the shading from base to tip. The base of each petal should be darkest because it sits in the shadow of the disc. Shade from base outward, getting lighter as you move toward the petal tip.
Q: How do I draw the sunflower center (disc) so it looks textured?
Draw two sets of overlapping spirals across the disc area, forming small diamond-shaped cells. Inside each cell, add a tiny dark comma mark at the base. Lift the center of each cell slightly with a kneaded eraser. This creates the raised, bumpy texture of the disc florets. The outer ring of the disc where it meets the petals should be your darkest area.
Q: What pencil should I use for shading sunflower petals?
Use H pencil for your first light shading layer, HB for mid-tone depth, and 2B for the darkest shadows at the petal base and in the gaps between petals. Always build up from light to dark — it’s much easier to darken a light area than to lighten an over-shaded one.
Q: How long does it take to draw a detailed sunflower?
A basic sunflower sketch takes about 20–30 minutes. A fully shaded, detailed pencil drawing with disc texture, leaf shading, and stem detail takes most intermediate artists 1.5 to 3 hours. Don’t rush the shading stages — shading is where most of the realism comes from, and it rewards slow, patient work.
Your Next Step
You now have everything you need to draw a realistic, detailed sunflower from scratch. You understand the anatomy, you know which pencils to use at each stage, and you have step-by-step guidance from first sketch line to final shading pass.
Here’s how to make the most of this guide:
- First attempt: Follow the guide exactly as written. Don’t skip steps. Even if you’re experienced, building the sketch in the correct order makes the shading much easier.
- Second attempt: Try the tilted-angle technique from Section 7. Draw the flower head as an ellipse and vary the petal lengths. You’ll immediately see the difference in how alive the drawing looks.
- Practice focus: The disc center is the hardest part. Spend a full session practicing just the disc texture on a scrap piece of paper before tackling a complete drawing. Getting the spiral pattern and the cell shading right will make every future sunflower drawing dramatically better.
Sunflowers are one of the most rewarding subjects in botanical drawing. The complexity is real — but so is the payoff when all three zones come together into a finished piece.
Grab your sketchbook. Start with the circle. Build from there.