How to Draw an Apple Step by Step
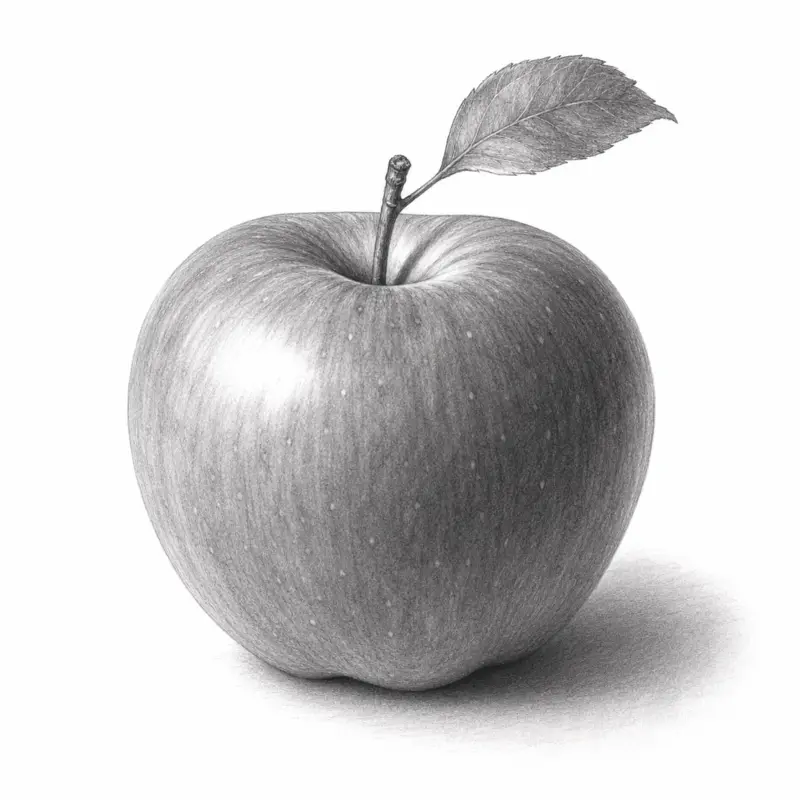
Drawing an apple sounds simple. Then you try it. The shape looks flat. The shading feels messy. The apple turns into a tomato with a stick on top. Most beginners struggle because they skip the structure. They focus on details too early. Realistic drawing starts with simple shapes, light direction, and smooth shading.
Materials You Need Before You Start
Keep your tools simple. Fancy supplies will not improve your drawing skills.
Here is all you need:
- HB pencil for sketching
- 2B or 4B pencil for shading
- Eraser
- Paper
- Blending stump or tissue
- Colored pencils (optional)
If you want smoother shading, use thicker paper. Thin paper can wrinkle during blending. Before drawing the apple, practice drawing circles. Apples are not perfect circles, but this exercise improves hand control.
Step 1: Build the Apple Shape Correctly
Most bad apple drawings fail at the outline stage. A real apple is not a perfect circle. It has bumps, curves, and uneven edges.
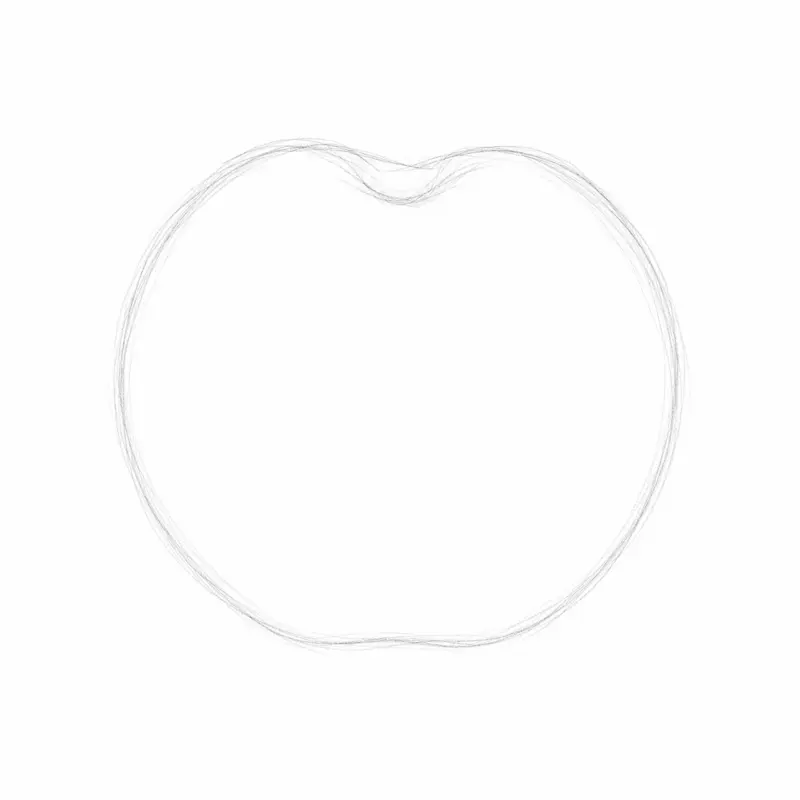
Start With a Loose Circle
Lightly sketch a circle using your HB pencil. Do not press hard. You will erase parts later. The circle should look slightly wider in the middle. Think of the circle as a guide, not the final shape.
Add the Top Indentation
At the top center, draw a small inward curve. This creates the dent where the stem sits. Do not make it too deep. A shallow curve looks more natural.
Flatten the Bottom Slightly
Most apples are not fully round underneath. Flatten the bottom edge just a little. This tiny adjustment makes the fruit look realistic.
Draw the Stem
Sketch a thin stem rising from the top dent. Angle it slightly instead of drawing it perfectly straight. Nature rarely creates straight lines.
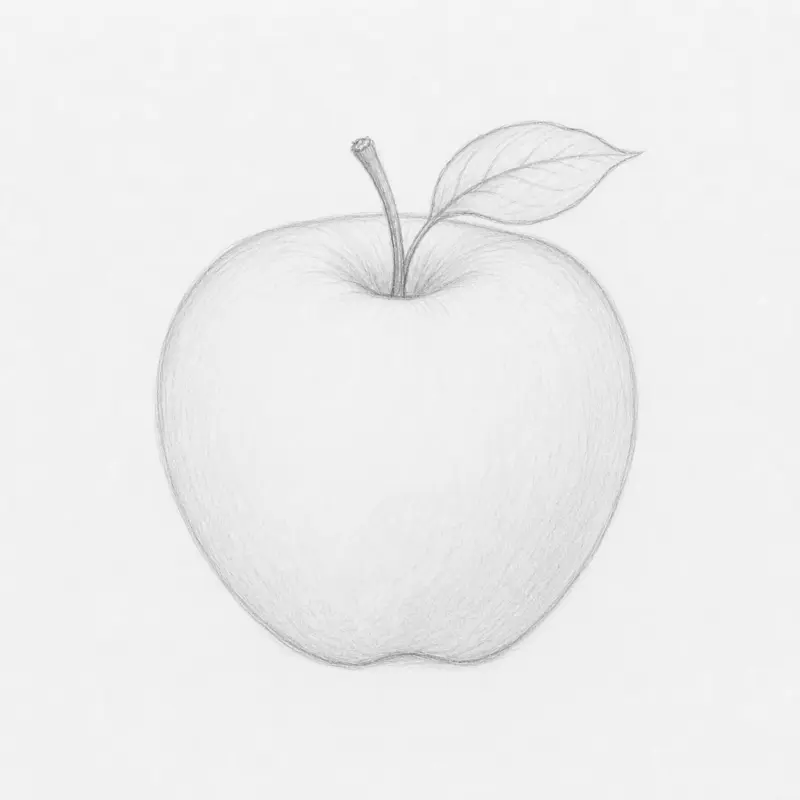
Add a Leaf (Optional)
Attach a curved leaf to one side of the stem. Draw a center vein first. Then shape the leaf around it. Keep your lines loose and light.
Step 2: Learn Basic Apple Shading
Shading creates depth. Without shading, your apple will look flat like a sticker. This section teaches you exactly how to shade a sphere-like object.
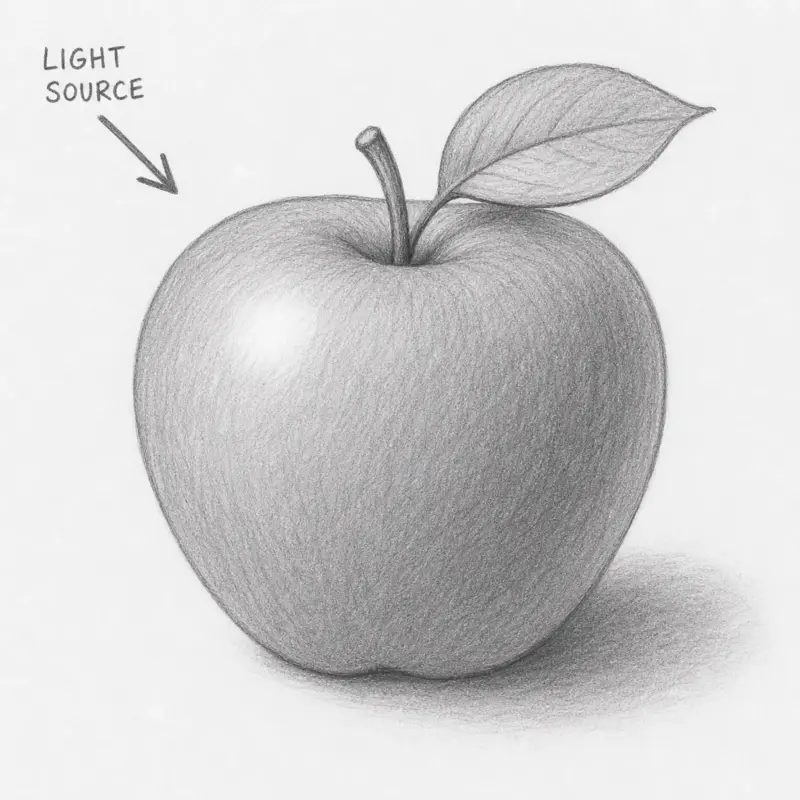
Understand the Light Source
Before shading, decide where the light comes from. Imagine a lamp shining on the apple.
If the light comes from the left:
- Left side stays brighter
- Right side becomes darker
- Bottom area gains shadow
Pick one direction and stay consistent.
Mark the Highlight Area
Leave one small area white. This becomes the highlight. The highlight usually sits opposite the darkest shadow. Do not shade over it.
Shade the Midtones First
Use an HB pencil. Apply light pressure.
Shade the entire apple except:
- The highlight
- The reflected light area
Move your pencil in tiny circular motions. Avoid random scribbles. Smooth motion creates clean shading.
Blend the Graphite
Use tissue or a blending stump. Gently rub the graphite. This softens rough pencil marks. Do not overblend. Too much blending removes texture and makes the drawing muddy.
Darken the Core Shadow
Now switch to a softer pencil like 2B or 4B.
Darken:
- The bottom edge
- The far side from the light
- The top indentation
This creates volume. The apple should now look round.
Step 3: Make the Apple Look 3D
This stage separates beginner drawings from realistic ones. You will add contrast, reflected light, and form shadows.
Add the Cast Shadow
Every object creates a shadow on the surface below it. Draw an oval shadow beneath the apple.
The shadow should:
- Sit closest under the apple
- Fade outward softly
- Be darkest near the fruit
Do not draw a hard outline. Soft edges look realistic.
Create Reflected Light
Light bounces off surfaces. This creates a lighter strip near the darkest shadow. Leave a thin lighter edge opposite the main highlight. This trick instantly improves realism.
Deepen the Contrast
Contrast means difference between light and dark. Increase the darkest values carefully.
Focus on:
- The bottom curve
- The stem hole
- Areas far from the light
Avoid making everything dark. Strong highlights need dark shadows nearby.
Shade the Stem Properly
Many beginners ignore the stem. That breaks realism. Shade the edges darker than the center. This creates a cylindrical effect. Add tiny texture marks using short strokes. Wood texture should look uneven.
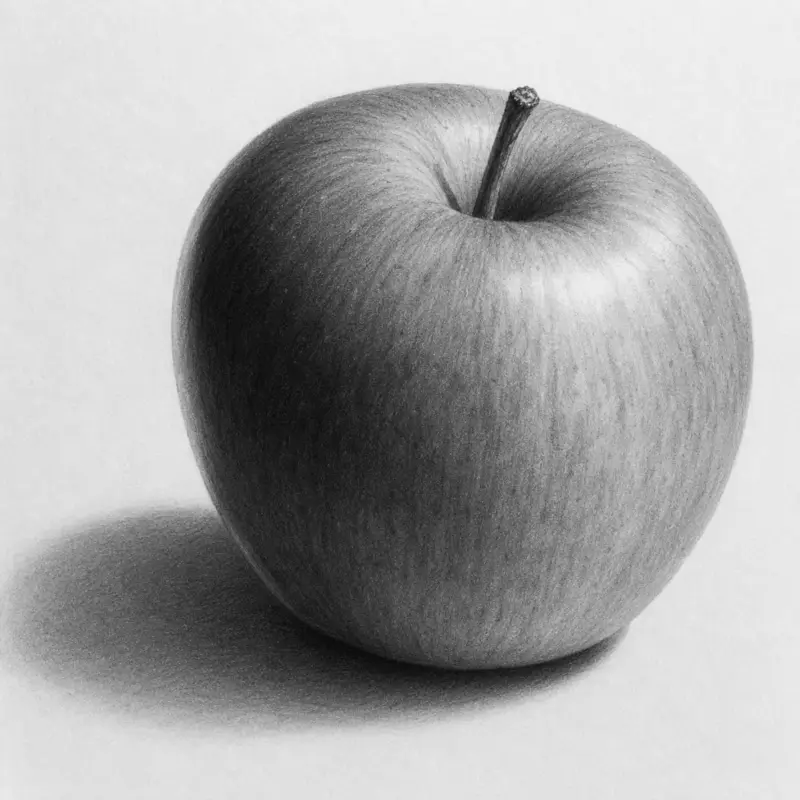
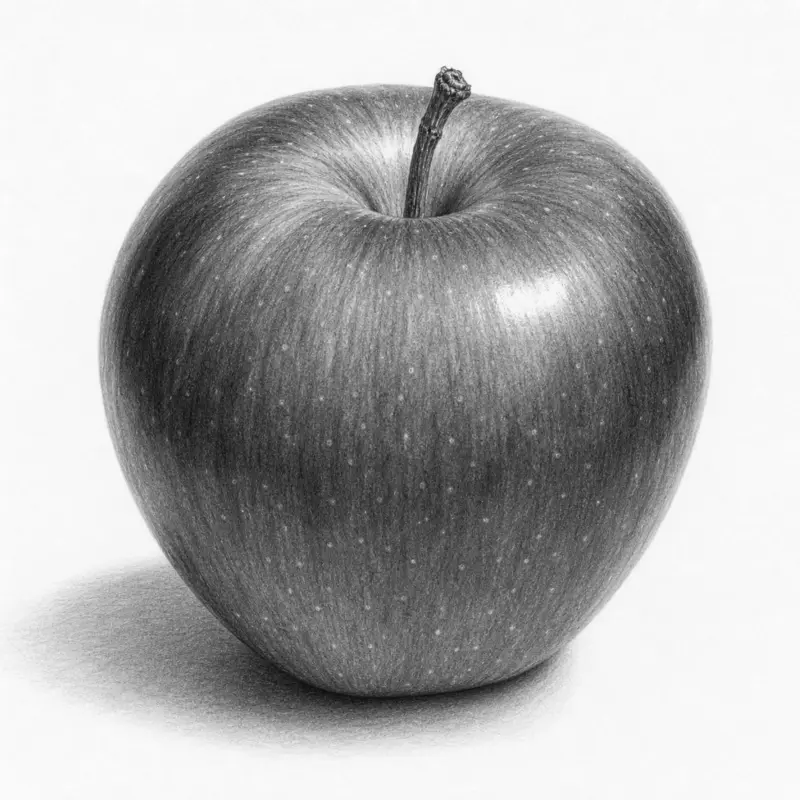
Draw Apple Texture
Real apples contain tiny pores called lenticels. Add small dots and tiny irregular marks across the surface. Do not place them evenly. Random placement looks natural. Use an eraser to create subtle bright spots.
Step 4: How to Color an Apple Realistically
A realistic apple needs color variation. One flat red tone looks fake. Real fruit contains many shades.
Start With a Base Color
Use light red first. Apply gentle layers. Do not press hard. Build color slowly.
Add Darker Reds
Layer darker reds on:
- Shadow areas
- Bottom curves
- Side edges
Blend the transition smoothly. Avoid sharp color changes.
Introduce Yellow and Green
Many apples contain warm yellow areas. Some have green patches near the top. Add these colors lightly. This creates realism and depth.
Burnish the Surface
Burnishing means blending colored pencil layers together. Use a white pencil or blender pencil. Press firmly in circular motions. The apple surface becomes smooth and shiny.
Add Final Highlights
Use an eraser or white gel pen. Place tiny bright spots near the highlight. Keep them small. Large highlights look cartoonish.
How to Draw a Cartoon Apple
Not every apple needs realism. Cartoon apples are fun and easier for beginners.
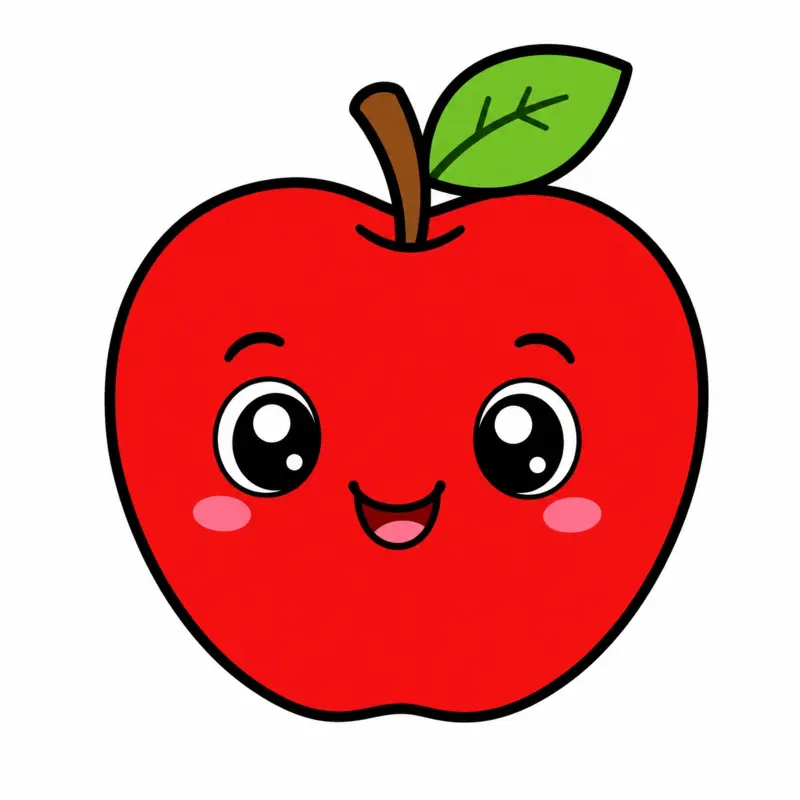
Use Simple Shapes
Start with a wide heart-like shape. Keep the curves exaggerated. Large shapes work better than tiny details.
Add Big Features
Draw:
- Large leaf
- Thick stem
- Big eyes
- Smiling mouth
Round features create a friendly appearance.
Use Bold Outlines
Trace the final sketch with darker lines. Cartoons rely on clean outlines.
Keep Shading Minimal
Add only simple shadows. Too much realism removes the cartoon style.
Common Apple Drawing Mistakes
Most beginners repeat the same problems. Fix these early.
Drawing a Perfect Circle
Real apples are uneven. Add subtle bumps and curves.
Ignoring the Light Source
Light direction controls all shading. Choose one light source and follow it.
Overblending the Graphite
Too much blending destroys texture. Blend lightly.
Using Heavy Sketch Lines
Dark outlines make shading difficult. Keep early lines faint.
Making Shadows Pure Black
Natural shadows contain soft transitions. Use layered graphite instead of harsh black patches.
Use Shape Breakdown Instead of Copying
Most tutorials teach you to copy the final apple. That approach slows learning. Professional artists simplify objects into shapes first. This method improves drawing speed and accuracy.
Step 1: Break the Apple Into Forms
See the apple as:
- One sphere
- One cylinder for the stem
- One curved leaf shape
Simple forms reduce confusion.
Step 2: Study Light on Basic Shapes
Practice shading:
- Spheres
- Cylinders
- Cones
Once you understand light on forms, you can draw almost any fruit.
Step 3: Use Edge Control
Hard edges attract attention. Soft edges create realism.
Keep:
- Highlight edges soft
- Cast shadows softer outward
- Texture edges subtle
Most tutorials ignore edge control completely. Yet it is one of the biggest realism tricks.
Practice Exercise: Draw Three Different Apples
Do not stop after one drawing. Skill grows through repetition.
Apple 1: Simple Outline
Focus only on shape. No shading.
Apple 2: Light and Shadow
Practice shading only. Ignore texture.
Apple 3: Full Realism
Combine:
- Shape
- Contrast
- Texture
- Color
- Cast shadow
This layered practice improves faster than repeating the same drawing style.
How to Draw an Apple Digitally
Digital drawing follows the same principles. Only the tools change.
Use Separate Layers
Create layers for:
- Sketch
- Base colors
- Shadows
- Highlights
This keeps your work organized.
Use Soft Brushes Carefully
Too much airbrushing makes fruit look plastic. Combine soft and textured brushes.
Flip the Canvas Often
Flipping reveals mistakes quickly. Professional digital artists do this constantly.
FAQ
How do you draw an apple step by step?
Start with a loose circle. Add the top indentation and stem. Shade lightly using one light source. Build darker shadows gradually. Finish with highlights and texture.
How do you make an apple look realistic?
Use smooth shading, strong contrast, reflected light, and uneven texture. Real apples are not perfect circles.
What pencils are best for drawing apples?
Use HB pencils for sketching and 2B to 6B pencils for darker shading. Softer pencils create smoother shadows.
How do you shade an apple properly?
Shade from light to dark gradually. Keep one highlight area bright. Blend softly and darken the edges opposite the light source.
How do beginners practice fruit drawing?
Practice basic forms first. Learn spheres and cylinders. Then move to apples and other fruits using simple lighting setups.
Final Thoughts
Drawing an apple teaches core art skills fast.
You learn:
- Shape construction
- Light direction
- Shading
- Texture
- Contrast
These skills apply to almost every object you will draw later. Start with simple sketches first. Do not chase perfection immediately. Draw one apple using only outlines. Draw another using only shading. Then combine both techniques into a finished realistic piece. That process builds real drawing skill faster than copying one detailed tutorial repeatedly.
“`html “`