How to Draw Animals From Shapes (Step-by-Step Guide for Beginners)
Most beginners approach animal drawing the wrong way. They dive straight into the eyes, fur, or tiny details — and then wonder why the whole drawing looks off. The truth is, animal anatomy isn’t the problem. The approach is.
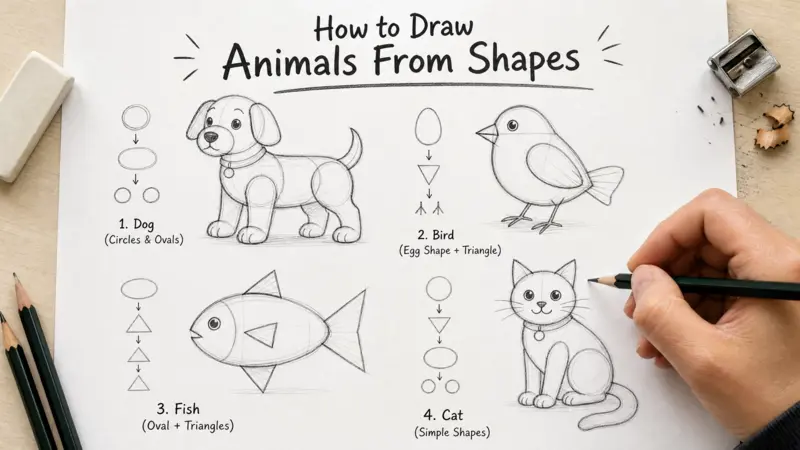
Professional artists don’t start with details. They start with shapes. A dog becomes a circle and an oval. A bird becomes an egg and a triangle. A fish becomes a stretched oval with fins. Once you learn to see animals as collections of simple geometric forms, the intimidation disappears — and the drawing actually starts to look right.
The Basic Shapes Every Animal Drawing Starts With
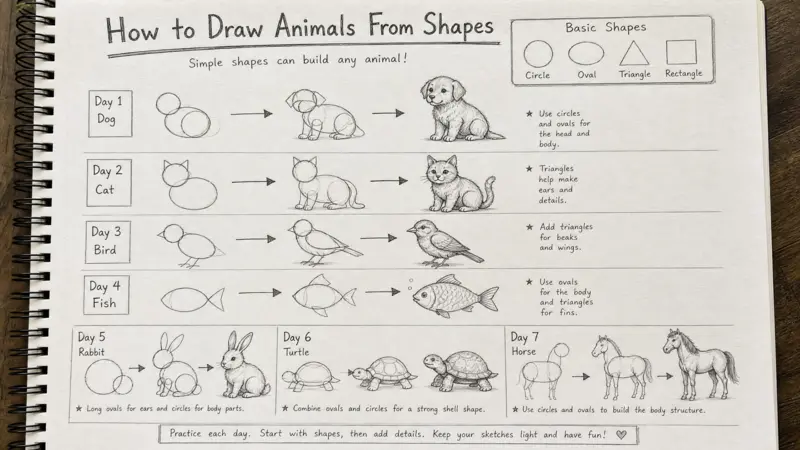
Before you draw a single animal, you need to get comfortable with five core forms. These are the building blocks that every artist — beginner or professional — uses to construct animals on paper.
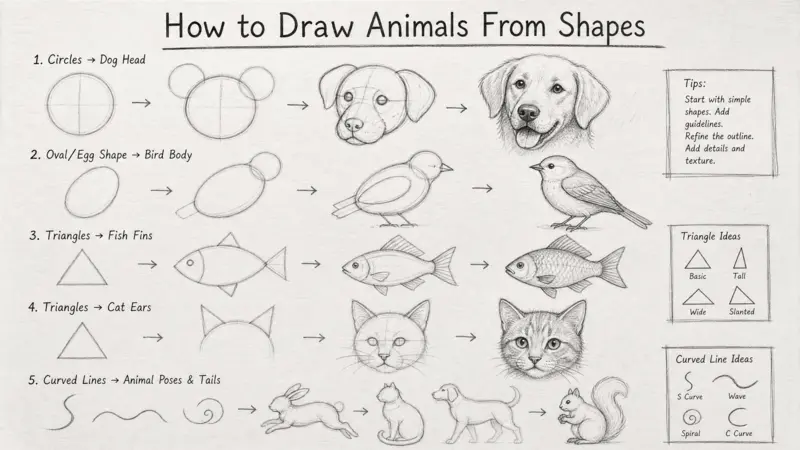
Circles are used for heads, joints, and rounded skull shapes. A dog’s head? Circle. A cat’s shoulder joint? Small circle. They help you establish size and placement before anything else.
Ovals shape the body. Most animal torsos are basically stretched ovals — wider for heavy animals like bears, longer and leaner for cats or fish. Ovals also work well for necks and tails.
Triangles handle sharp features: ears on a fox, a beak on a bird, the pointed snout of a wolf. They keep these features clean and readable without overcomplicating them.
Rectangles and cylinders block out legs. Rectangles show width and direction quickly. Cylinders add roundness and suggest muscle, which makes limbs look more natural. For most animals, you’ll use a combination of both.
Lines and curves control the pose. Experienced artists often start with a single curved spine line before drawing anything else. That line sets the direction of the entire body — whether the animal is walking, sitting, or mid-leap.
What Is Construction Drawing?
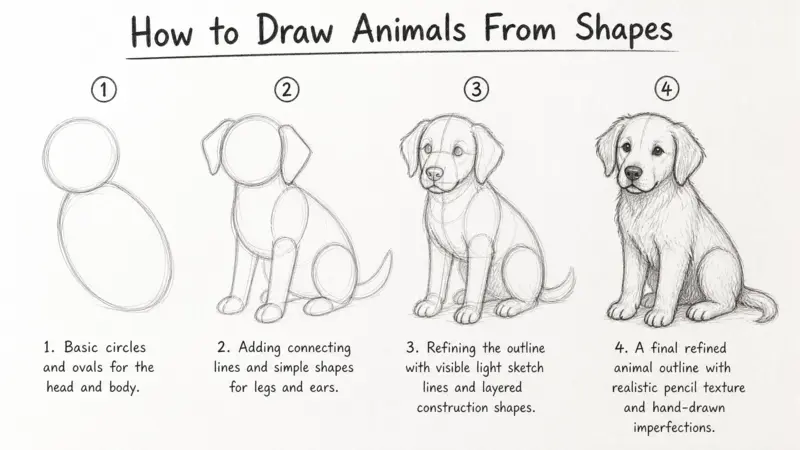
Construction drawing is the method of building a figure from shapes outward, not from details inward. You start with loose, light shapes — a big oval for the torso, a circle for the head, cylinders for the legs — then layer more detail on top as the structure becomes clear.
The key is staying light with your pencil in the early stages. Dark lines commit you too early. Light lines give you room to adjust proportions before you refine the outline. Only after the construction looks right do you move to fur, eyes, or texture.
This is how virtually every professional illustrator approaches animal drawing, and it’s the system this guide is built around.
Simple Tools You Actually Need
You don’t need expensive supplies to learn animal drawing. Here’s what works:
Pencils: An HB pencil is ideal for construction lines — it’s light enough to erase cleanly and dark enough to see. A 2B adds softer, darker lines for shading and fur texture. A mechanical pencil is great for thin, precise construction lines. Keep your tips sharp; sharp lines improve structure.
Paper: Smooth paper works best for clean line drawing. A standard sketchbook with medium-weight paper handles erasing well without wrinkling. Use larger paper sizes when practicing anatomy — more space means better proportion control.
Erasers: A kneaded eraser lifts light construction marks without damaging paper. A vinyl eraser handles darker lines. Avoid scrubbing aggressively during early sketching — heavy erasing can rough up the paper surface and make later lines messier.
Digital tools: If you prefer drawing on a tablet, the fundamentals are the same. Layers are especially useful for construction drawing — you can sketch shapes on one layer, then refine the outline on another. The undo button is handy, but don’t rely on it as a crutch. Repetition teaches more than correction.
How to See Animals as Simple Shapes
This is the real skill — and it’s less about drawing ability than about how you look at things.
When you study an animal, train yourself to ignore the fur, the spots, the individual hairs. Instead, ask: what is the largest mass in this body? Where is the head relative to the torso? How long are the legs compared to the body height?
A dog’s body, when you strip away the details, is essentially a large oval (chest/torso), a circle (head), four cylinders (legs), and a curved line (tail). A bird is an egg shape with a small circle on top, triangle beak, and oval wings. A fish is a stretched oval with triangular fins.
Look for large shapes first, always. The biggest mistake beginners make is zooming into details before the overall structure is correct. If the head is the wrong size or the legs are too short, no amount of careful fur rendering will save the drawing.
Use reference images freely. Studying from reference isn’t cheating — it’s how professionals work. When you study a reference, look at the body masses and how they connect. Notice where the rib cage sits, how the hips angle, how the legs attach. Then put the reference aside and reconstruct the animal from shapes. Don’t trace. Reconstruct.
Step-by-Step Animal Drawing Tutorials
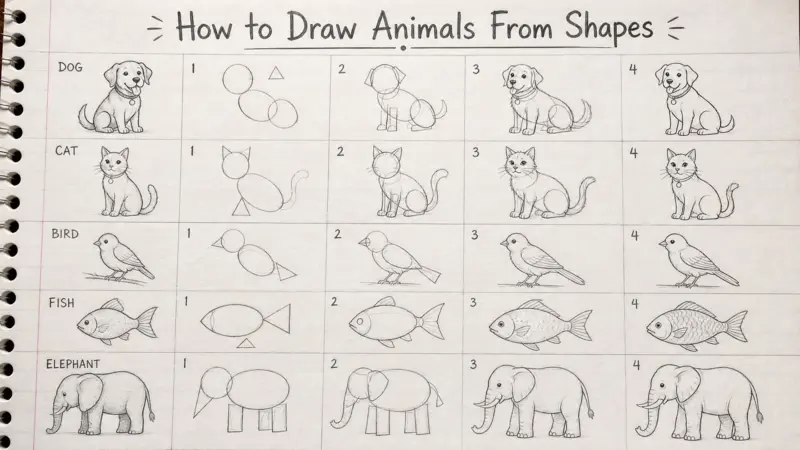
How to Draw a Dog
- Draw a medium circle for the head.
- Add a large oval for the chest and body — slightly below and behind the head.
- Connect them with soft guide lines for the neck.
- Block the front legs with rectangles or cylinders; add small circles for the shoulder joints.
- Do the same for the back legs, keeping proportions similar.
- Sketch a curved line for the tail.
- Add two triangle shapes for ears.
- Draw a smaller oval for the muzzle area.
- Keep facial guidelines light.
- Once the structure looks balanced, refine the outline — then add fur texture with short sketch lines last.
How to Draw a Cat
- Start with a circle for the head.
- Add a rounded oval for the body — cats have flexible, somewhat elongated torsos.
- Place two triangle shapes for the ears.
- Sketch the legs using soft cylinders — cats are lighter-built than dogs, so keep the limbs slender.
- Add a long, flowing curved line for the tail.
- Sketch almond-shaped eyes after the structure is in place.
- Refine the face and whisker placement last.
How to Draw a Bird
- Draw an egg-shaped oval for the body.
- Add a small circle for the head and connect it with short neck lines.
- Use a triangle for the beak.
- Sketch wings as curved oval shapes near the body center.
- Add thin straight lines for legs, with small curved strokes for claws.
- Keep the tail simple — a few straight lines fanning out.
- Once the structure is set, add feather direction with light, grouped strokes.
How to Draw an Elephant
- Draw a large oval for the body — elephants are broad and heavy, so make it wide.
- Add a medium circle for the head.
- Use thick cylinders for all four legs — straight and sturdy.
- Add small rounded shapes for the feet.
- Sketch the trunk with two long curved lines that taper downward.
- Add large ear shapes on either side of the head.
- Place the eyes low on the face.
- Refine with light texture lines to suggest skin folds.
How to Draw a Fish
- Start with a stretched oval for the body.
- Draw a center line through the body to maintain symmetry.
- Add triangles for the tail and fins — keeping both sides balanced.
- Place a circle for the eye near the front of the body.
- Sketch a curved gill line behind the head.
- Use curved lines to suggest fin movement.
- Add scale details only after all proportions are confirmed.
How to Draw Cartoon Animals
Cartoon animals use the same shape-based approach, but with exaggerated proportions. Bigger heads, oversized eyes, shorter legs, and rounder forms all contribute to the playful look. Avoid adding realistic muscle detail. Keep lines soft and shapes simple — readability matters more than accuracy in cartoon style. Small eyebrows and mouth lines go a long way for expression.
Common Beginner Mistakes (and How to Fix Them)
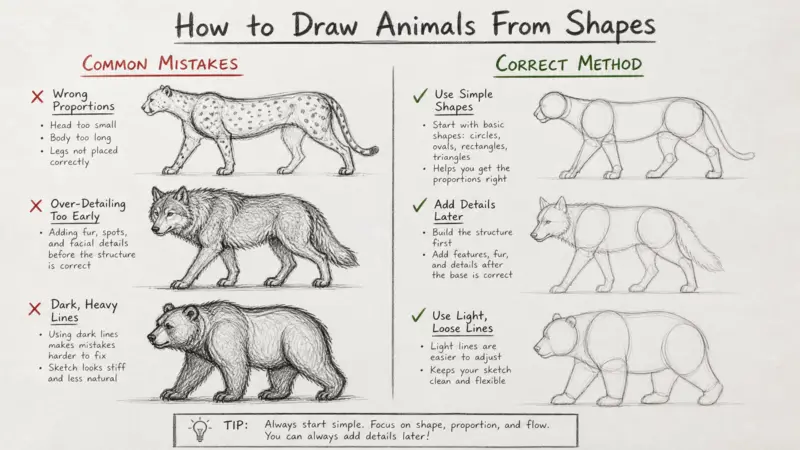
Starting with details too early. Eyes, fur, and texture should come last. If you draw them first, the body structure underneath will almost certainly be wrong. Build the full construction before touching details.
Pressing too hard with the pencil. Dark construction lines are harder to erase and easier to commit to too early. Use light, feathery strokes during the building phase.
Ignoring proportions. A head that’s too large or legs that are too short will undermine the whole drawing. Get in the habit of comparing body parts: How big is the head relative to the torso? How long are the legs relative to the body height?
Making shapes too complex. When in doubt, simplify. Beginners often add too many shapes when one clear oval or cylinder would do the job better.
Copying outlines without understanding structure. Tracing an animal’s silhouette teaches you nothing about how it’s built. Instead, study the animal in pieces — head, torso, limbs — and rebuild it from shapes each time.
How to Practice Faster (And Actually Improve)
The 10-Minute Daily Shape Exercise
Spend two minutes drawing animal heads with circles. Spend three minutes sketching body structures using ovals and cylinders. Use the remaining five minutes to draw complete animals — dogs, cats, birds, fish. No textures. No shading. Just structure. Repeat daily.
Gesture Drawing
Gesture drawing means capturing the movement and energy of an animal in quick, loose strokes. Start with a single curved spine line, add basic shapes around it, and aim to finish in under a minute. Fast gesture sketches build your eye for proportion and natural body flow more effectively than slow, careful drawings.
Use Reference Photos Correctly
Study the reference — then put it aside. Rebuild the animal from shapes without looking. Check your construction against the reference afterward. This trains observation and structure at the same time.
Draw the Same Animal Repeatedly
Pick one animal for a week. Draw it from multiple angles and in different poses each session. You’ll notice proportions and body logic clicking into place much faster than if you jump between different animals every day.
Track Your Progress
Keep all your practice drawings in one sketchbook and date them. Look back every week or two. You’ll notice cleaner construction lines, better proportions, stronger movement — even when day-to-day improvement is hard to see.
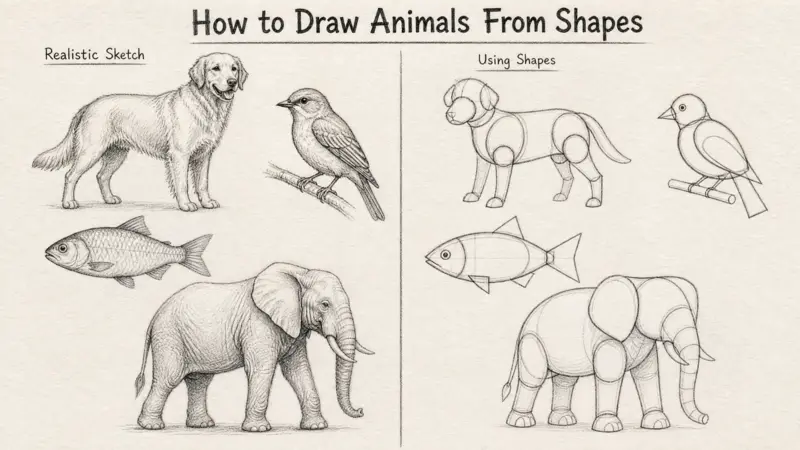
From Simple Shapes to Realistic Anatomy
Once the shape-based approach feels natural, you can begin transitioning toward more realistic anatomy — and you’ll find it much easier than if you’d tried to learn anatomy first.
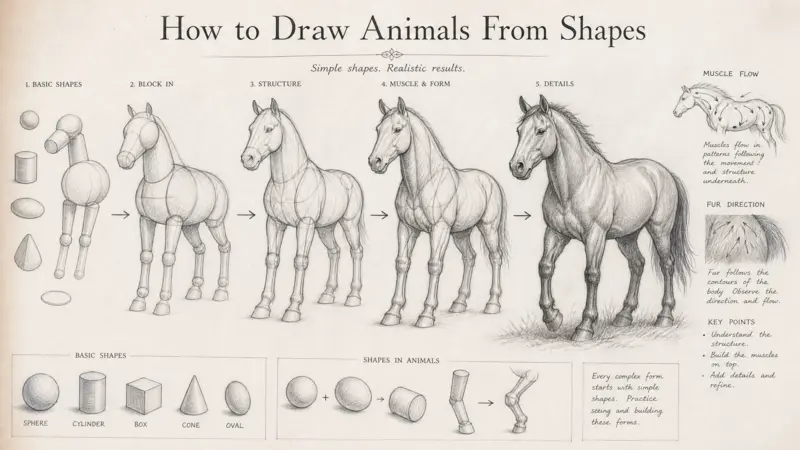
Realistic animal muscles follow the same cylindrical and oval logic as construction shapes. The shoulder is a rounded mass. The leg muscles are stacked cylinders. The spine is a curving line that everything else hangs from.
Adding fur texture: Fur follows the body’s contours. Short strokes for tight fur areas, longer strokes for thick coats. Texture goes on after the body structure is finalized — never before.
Improving animal poses: The spine line you draw at the start controls the whole pose. A curved spine creates natural movement. A straight spine creates stillness. Study how the hips and shoulders counter-balance each other in walking or running poses.
Understanding light and shadow: Choose one light source before shading. Shadows typically appear under the belly, under the neck, and along the inner legs. Start with light pressure and build gradually — shading is easier to add than to remove.
Animal expressions: Small changes in eye size, ear angle, and eyebrow position create very different emotions. Raised ears suggest alertness. Lowered eyes suggest calm or sadness. Wide eyes read as playful or surprised. Study these patterns before adding expression to your sketches.
Teaching Kids to Draw Animals From Shapes
Children learn drawing faster when the process is visual and simple. Shapes are perfect for this — kids already recognize circles and triangles, so the connection to animals feels natural rather than intimidating.
Best starting animals for kids: Fish (a simple oval with triangles), cats (circle, oval, triangle ears), and birds (egg body, small circle head, triangle beak). These have clear, readable forms that produce satisfying results quickly.
Keep lessons short: Five-minute sessions work better than long ones for younger learners. Draw one animal, trace it once, then redraw it freehand. That cycle — observe, trace lightly, rebuild — builds both memory and confidence.
Encourage creativity over accuracy: Let kids exaggerate shapes freely. A cat with a giant head and stubby legs is still a cat — and learning to make intentional proportion choices is itself a valuable drawing skill.
Final Tips
- Draw loosely first. Light, flexible lines during construction. Commit to the outline only when the structure looks right.
- Focus on large shapes before small details. The body mass, head placement, and leg positions come before eyes, fur, and texture.
- Practice consistently. Short daily sessions outperform long irregular ones. Even ten minutes a day builds real skill over weeks.
- Develop your observation skills. The more carefully you study animals — their body movement, joint placement, proportions — the more accurately you’ll be able to reconstruct them from memory.
- Keep your old drawings. Progress is easier to see in comparison than in isolation. Old sketches reveal how far you’ve actually come.
FAQ About How to Draw Animals From Shapes
What shapes are used to draw animals? Circles, ovals, cylinders, and triangles cover the vast majority of animal forms. Circles for heads and joints, ovals for body masses, cylinders for limbs, and triangles for sharp features like ears and beaks.
What is the easiest animal to draw for beginners? Fish and cats are great starting points — both use simple, clear proportions. Cartoon birds are also excellent because the egg-shaped body and triangle beak are very forgiving.
How do you simplify animal anatomy? Break the body into its major masses first: head, torso, hips. Then add limbs as cylinders. Focus on how parts connect before adding any surface detail.
Can kids learn animal drawing with shapes? Absolutely. The shape-based approach was practically designed for young learners. Visual, simple, and immediately satisfying — it works well for ages 5 and up.
Should I learn cartoon or realistic animals first? Start with cartoon. Simplified proportions are more forgiving and help you internalize the shape-based method without getting overwhelmed by anatomy. Realistic drawing becomes much easier after that foundation is in place.
How long does it take to improve? With consistent daily practice, most beginners notice real improvement within two to four weeks. The key word is consistent — ten minutes every day beats two hours on the weekend.
Conclusion About How to Draw Animals From Shapes
Animal drawing doesn’t start with fur, eyes, or anatomy charts. It starts with a circle, an oval, and a curved line. Every complex animal illustration — no matter how detailed — is built on that same simple foundation.
The shape-based approach gives beginners something concrete to work with: not “draw a dog,” but “draw a circle for the head, an oval for the body, cylinders for the legs.” That specificity removes the guesswork, and the structure it creates makes details easier to add later.
Practice consistently. Draw loosely. Focus on large forms before small ones. Keep your old sketches. And most importantly — keep drawing.