How to Improve Drawing Skills: Practical Techniques That Actually Work
Most people who want to get better at drawing make the same mistake: they look for shortcuts instead of building a foundation. They follow ten different tutorials, buy better supplies, and still end up wondering why their sketches don’t look the way they want.

The truth is uncomfortable but simple — drawing is a skill, and skills improve through structured, consistent practice. Not talent. Not the right pencil. Not finding the perfect YouTube channel. Observation, repetition, and focused exercises are what actually move the needle.
Why Most People Struggle to Improve at Drawing
The Talent Myth
The single biggest obstacle for most beginners isn’t ability — it’s the belief that ability is fixed. When someone sees a skilled illustrator’s work and thinks “I could never do that,” they’re usually attributing years of deliberate practice to something unteachable. Professional artists don’t draw well because they were born with it. They draw well because they’ve spent years studying proportions, light, anatomy, and perspective — and they’ve made thousands of rough, ugly sketches along the way. Hand-eye coordination, accurate visual measurement, the ability to notice subtle angles and shadow patterns — these are all learned skills. They develop slowly through repetition, and they develop in everyone who puts in the work consistently.
Common Beginner Mistakes
One of the most common problems is drawing from memory rather than observation. Many beginners draw symbols — the almond-shaped eye from childhood, the V-shaped bird in the distance, the lollipop tree. These symbols feel natural because they’re stored in visual memory, but they rarely match what objects actually look like. Real eyes have folds, shadows, and asymmetric curves. Real trees have organic, irregular forms.
Beyond that, most beginners make at least a few of these mistakes:
Skipping fundamentals. Jumping straight to portraits or complex scenes before understanding perspective, form, or proportion almost always creates a ceiling. These foundational skills seem boring until you realize that every advanced illustration is built on them.
Erasing every imperfect line. This breaks sketching rhythm and creates hesitant, stilted linework. Rough lines during early stages are normal and expected — fighting them slows everything down.
Practicing inconsistently. Drawing once or twice a week builds almost no visual memory. Short daily sessions — even fifteen minutes — are dramatically more effective than a two-hour session on the weekend.
Comparing too early. Looking at professional work when you’re a month into drawing is like a new runner comparing themselves to a marathoner. It creates false benchmarks and often kills motivation before real progress begins.
Start With the Core Drawing Fundamentals
Every advanced drawing technique traces back to a small set of fundamentals. Skipping them doesn’t save time — it creates problems that have to be untangled later.
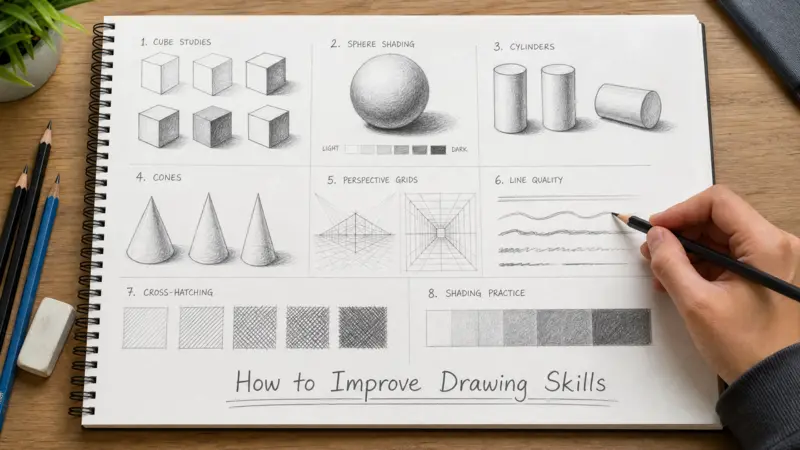
Basic Shapes and Forms
Every object, no matter how complex, can be broken into simple geometric forms. Artists use this not as a beginner shortcut but as a professional workflow: start with the large, underlying structure before adding any surface detail.
A cube teaches perspective, edges, and directional lighting. A sphere shows how light wraps around a rounded surface and creates smooth value transitions. A cylinder appears everywhere — arms, legs, cups, bottles, tree trunks — and teaches how curved surfaces behave in perspective. Cones help with tapering forms, fabric folds, and stylized shapes.
Once you can draw these forms convincingly and understand how light falls on each one, complex subjects become much more manageable because you can reduce them to combinations of shapes you already understand.
Line Quality
Confident lines make sketches look cleaner and more readable. The opposite — short, scratchy strokes built up into an uncertain outline — is one of the most common signs of a beginner, and it’s entirely a habit, not a limitation.
Good linework comes from drawing with your whole arm rather than just your wrist. Large shoulder movements produce longer, smoother strokes. Wrist-only drawing limits stroke length and creates the hesitant, scratchy quality that’s hard to clean up later.
Line weight also matters. Thicker lines push elements forward visually; lighter lines recede. Artists typically sketch lightly during construction and darken only the final lines they’re committing to — this keeps proportions flexible for longer and produces cleaner finished work.
Proportions
Correct proportions are what make drawings look believable. A face with one eye slightly too high, or a figure with arms just a bit too short — these problems register immediately even when viewers can’t articulate what’s wrong.
The fix isn’t to measure more carefully in a mathematical sense. It’s to compare constantly. How wide is the head relative to the shoulders? How far down the face do the eyes sit? Where does the elbow fall relative to the waist? These comparisons take seconds and prevent the kind of proportion errors that require major corrections later. Many artists use their pencil held at arm’s length as a simple measuring tool while sketching from reference.
Light, Shadow, and Shading
Without shading, most drawings appear flat regardless of how well-proportioned they are. Understanding light is what creates the illusion of three-dimensional form on a flat surface.
The basic elements — highlights, midtones, and cast shadows — each serve a different function. Highlights show where light hits directly. Midtones describe the gradual transition across a curved surface. Cast shadows ground objects and add spatial depth. Before shading any drawing, establish the light source direction first. Every shadow in the drawing should be consistent with that single decision.
Blending techniques (tissue, blending stumps, or layered strokes) soften transitions. Cross-hatching builds shadow through overlapping lines and adds texture. Both are worth practicing separately before applying them to finished drawings.
Perspective Basics
Perspective is what makes environments and objects look correct from a specific viewpoint. Without it, buildings look warped, boxes look impossible, and figure drawings float without any sense of ground.
One-point perspective — where all lines converge at a single vanishing point on the horizon — works well for corridors, roads, and interiors viewed straight-on. Two-point perspective adds a second vanishing point and handles angled views of buildings and objects. The horizon line represents eye level, and everything above or below it behaves differently. Even a basic understanding of these principles will immediately improve how your environments and object drawings read.
The Best Daily Exercises to Improve Faster
The difference between artists who improve quickly and those who plateau isn’t talent — it’s the quality of their practice. These exercises target specific skills and compound over time.
Gesture Drawing
Gesture drawing is one of the highest-return exercises available to any artist. The goal is to capture the movement, weight, and energy of a pose in 30 to 60 seconds — not to produce a finished drawing. This forces simplification: you can’t render details in 30 seconds, so you learn to find the essential line of action and the large masses, and nothing else.
Over time, this trains faster visual decision-making, improves anatomy intuition, and eliminates the stiff, lifeless quality that plagues drawings built from careful outlining rather than felt movement. Aim for at least 20 gesture sketches per session. Posemaniacs and Line of Action both offer free timed pose references.
Blind Contour Drawing
In blind contour drawing, you draw a subject without looking at your paper — eyes on the object, hand moving continuously. The results are usually strange and distorted, but that’s not the point. The point is the quality of observation it forces. You slow down and actually look at edges, curves, and shapes instead of drawing what you think the object looks like.
This exercise is particularly effective for breaking symbol-drawing habits. After a few sessions of blind contour work, artists typically notice they’re seeing more accurately when they return to normal sketching.
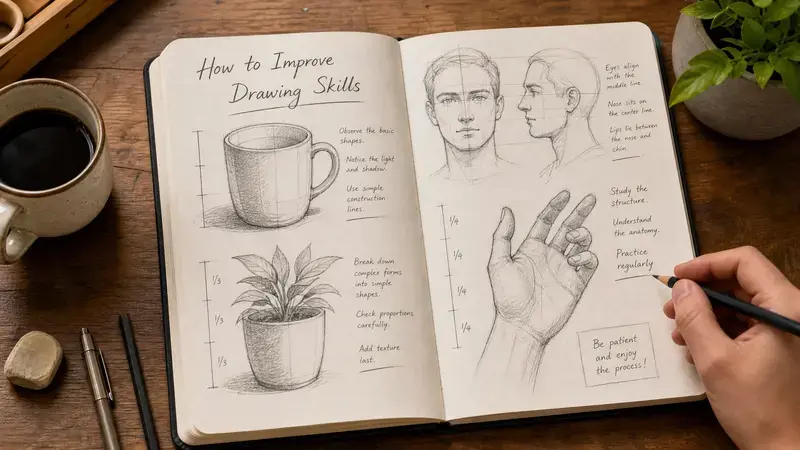
Drawing From Real Life
Photos are convenient references, but they compress information. Lighting gets flattened, depth cues disappear, and perspective gets distorted by camera lenses. Real objects preserve all of that — the way shadow wraps around a form, the subtle reflected light under a chin, the true depth between foreground and background.
Start with simple household objects: a coffee mug, a shoe, a stack of books. Then move to plants (good for organic, irregular shapes), hands (excellent for anatomy and proportion practice), and faces (structure, symmetry, and shading all in one). Real-life drawing sessions, even short ones, improve visual memory faster than photo-based work alone.
Timed Sketch Sessions
Setting time limits changes the quality of practice in a useful way. With five minutes to sketch something, you can’t agonize over every line — you have to identify what’s most important and put it down. This trains prioritization and reduces overthinking.
A practical progression: five-minute studies for quick observation, fifteen-minute studies for deeper form analysis, and thirty-minute sessions for controlled, layered drawings that include light and shadow. The frequency of sketches matters more than their polish, especially in the early stages.
Redrawing Old Sketches
Every few months, go back to an older drawing and redo it. This is one of the most direct ways to measure real improvement — you’ll see immediately whether your proportions are more accurate, your lines more confident, your shading more controlled. It also reveals persistent weaknesses: if the same problem appears in drawings from three months ago and drawings from today, that’s a clear signal about what to focus on next.
Daily Sketchbook Habit
A sketchbook serves a specific function: it’s a low-stakes space for quantity over quality. The goal isn’t to fill it with finished illustrations but to draw frequently, experiment freely, and accumulate the repetitions that build muscle memory. Rough ideas, quick studies, failed attempts — all of it has value. Many artists find that their loosest, most experimental sketchbook pages contain their best ideas.
How to Train Your Eye Like an Artist
Technical skills matter, but observation is what feeds them. Artists who draw accurately aren’t just more skilled with a pencil — they see differently.
Learn to See Shapes Instead of Objects
When a beginner looks at a chair, they see “a chair.” When an experienced artist looks at the same chair, they see a collection of rectangular forms, cylindrical legs, and negative spaces between the parts. That difference in perception is learnable.
Practice breaking every subject into its basic geometric components before drawing anything. A face becomes a sphere (skull), planes (forehead, cheeks, jaw), and cylinders (neck). A tree becomes cylinders (trunk and branches) and irregular organic masses (foliage). This decomposition process removes the cognitive overload of trying to draw something complex and replaces it with a series of manageable forms.
Understand Negative Space
Negative space is the empty area around and between objects. Most beginners ignore it entirely, but artists use it constantly as an accuracy check. If you draw the shape of the space between a chair’s legs, you’ll often get the chair itself more accurately than if you try to draw the chair directly — because you’re looking at an unfamiliar shape rather than a symbol you think you already know.
Study the negative shapes in whatever you’re drawing. They reveal proportion errors that might not be obvious when looking only at the object itself.
Study Light in Everyday Life
Light is everywhere, and every surface you see is a lesson in how it behaves. Notice how window light creates soft shadow transitions indoors. Notice how outdoor midday sun creates sharp, high-contrast shadows. Watch how reflective surfaces — glass, metal, polished wood — bounce light back onto nearby objects. Observe how shadows wrap around rounded forms versus flat planes.
You don’t need to be sketching to improve this skill. Simply paying attention to light throughout the day builds the visual library that makes shading feel intuitive rather than guessed.
Use Reference Images Correctly
Reference images are tools for understanding, not templates for copying. The goal when working from reference isn’t to reproduce the photo — it’s to analyze why things look the way they do. Where exactly does that shadow fall, and why? How does the perspective work in this pose? What’s the structural logic underneath the surface?
Professional illustrators often collect multiple references and compare them: different lighting conditions on the same subject, multiple angles of the same pose, various examples of similar anatomy. They study construction lines and proportion relationships before drawing anything. This active analysis is what makes reference useful — passive copying rarely improves the underlying skills.
How to Practice Consistently Without Burning Out
Many beginners start strong and fade within a few weeks — not because they lost interest, but because their practice routine wasn’t sustainable.
Create a Realistic Schedule
Fifteen to thirty minutes daily is more effective than three hours every Sunday. That’s not an opinion — it’s how skill acquisition works. Short, frequent sessions keep visual memory active and build habits gradually without creating the mental exhaustion that leads to burnout.
Weekly goals help focus these sessions. Anatomy this week, perspective next week, shading the week after. Rotating focus prevents the flatness that comes from practicing the same thing repeatedly and keeps each session feeling purposeful.
Focus on One Skill at a Time
Trying to improve proportions, shading, perspective, and anatomy simultaneously usually means improving none of them very quickly. Organized study themes — even loosely structured ones — create faster, more measurable progress. When you spend a focused week on perspective drawing, you’ll notice clearer improvement than if you practiced perspective occasionally alongside everything else.
Stop Chasing Perfect Drawings
This might be the most important mindset shift in this guide. Perfect sketches rarely appear during practice, and pursuing them slows improvement. Messy, rough drawings that expose mistakes are more valuable than clean drawings that avoid them. The errors in practice sketches are information — they show you exactly what to focus on next.
Build Motivation Through Small Wins
One of the most effective motivation strategies is comparison with your own past work. Save your practice drawings and date them. Monthly redraw challenges — taking an old drawing and recreating it with your current skills — make progress visible in a concrete, satisfying way. Small improvements that feel invisible day-to-day become obvious when you compare a sketch from four months ago to one from today.
Avoid These Motivation Killers
Tutorial consumption without practice. Watching drawing videos creates the feeling of learning without actually building skill. Every tutorial should be followed by an immediate attempt to apply what you just watched. Information without practice doesn’t transfer.
Comparison with professionals. Experienced artists have years of repetition behind their current skill level. Comparing your early work to their published illustrations is genuinely unfair to yourself, and it usually creates discouragement rather than motivation.
Quitting after bad drawings. Bad drawings aren’t failures — they’re diagnostics. A sketch where proportions fall apart reveals exactly what needs work. Artists who accept rough practice work and analyze it honestly improve much faster than those who erase and avoid their problem areas.
The Best Tools for Improving Drawing Skills
Good tools support learning, but they don’t create it. Beginners rarely need more than a few pencils, an eraser, and a sketchbook to make real progress.
Pencils: Different graphite grades serve different purposes. HB is a good all-purpose sketching pencil. 2B produces darker, softer lines good for shading and looser sketching. 4B and 6B go darker still, useful for building deep shadow values. Having two or three grades covers most needs.
Erasers: A kneaded eraser lifts graphite gently without damaging the paper surface — ideal for lightening construction lines. A vinyl eraser handles darker marks more aggressively. Both are worth keeping on hand.
Sketchbook: Any size works for daily practice. Portable, smaller sketchbooks encourage drawing on the go and quick observation studies. Larger formats are better for full-figure anatomy work and detailed studies.
Charcoal: Excellent for shadow and value practice. Charcoal forces broader, less detailed work and improves understanding of large tonal relationships.
Fineliners: Drawing with ink (no undo, no erasing) builds commitment and line confidence faster than pencil alone. Even occasional ink sessions noticeably improve the decisiveness of pencil work.
For digital tools: entry-level drawing tablets are affordable and adequate for most beginners. Layers and undo are genuinely useful for studying construction, but over-reliance on digital correction can undermine the line confidence habits that traditional practice builds.
How Long Does It Take to Get Better?
Improvement is gradual and non-linear, but it’s entirely predictable if you practice consistently.
After one month of daily sketching, most beginners notice cleaner lines and more accurate basic shapes. The eye is beginning to see more carefully.
After three months, proportions and shading usually improve noticeably. Hand-eye coordination is stronger, and the sketching process starts to feel less effortful.
After six months of focused practice, perspective, anatomy, and composition typically show real development. Drawings start to look structurally coherent even at rough stages.
After one year, most artists with consistent habits have solid fundamentals and can approach complex subjects with a clear construction process rather than guesswork.
These timelines vary based on practice quality, not just hours spent. Thirty focused minutes daily will produce faster improvement than two distracted hours — because what matters is the quality of attention, not just the time logged.
Signs your skills are improving:
- Proportions landing more accurately without as many corrections
- Scratchy, hesitant linework decreasing
- Faster shape recognition when starting a new sketch
- Fewer major proportion errors in figure drawings
- Light and shadow feeling more intuitive rather than guessed
Advanced Tips After You’ve Built the Basics
Once fundamentals feel comfortable, these areas offer the most growth.
Study anatomy for character drawing. Simplified anatomical knowledge — major muscle groups, how the skeleton affects surface form, proportional relationships between body parts — dramatically improves figure and character work. Start with the big shapes (ribcage, pelvis, limb masses) before adding surface detail.
Improve composition and storytelling. Composition is how you arrange elements within the frame to guide the viewer’s eye and create visual impact. Focal points, balance, contrast, and directional flow are all compositional tools. Even strong technical drawings fall flat without thoughtful arrangement.
Experiment with different styles. Realism improves observation and shading. Cartoon and stylized work trains simplification and exaggeration. Manga studies improve dynamic posing and emotional expression. Each style teaches something the others don’t, and exploring them makes you more flexible as an artist.
Study master artists analytically. Don’t just admire professional work — dissect it. How did they handle the light? What’s the construction logic underneath the rendering? How did they simplify or exaggerate forms? Recreating small sections of work you admire, with the goal of understanding the decisions rather than copying the result, is one of the fastest ways to absorb advanced technique.
Mistakes That Slow Down Progress
Drawing only from imagination. Imagination-only drawing often produces the same distortions and symbol-drawings repeatedly. Observation studies are what expand your visual library and correct those ingrained inaccuracies.
Ignoring perspective. Flat, spatially incoherent drawings almost always trace back to weak perspective understanding. Simple box exercises — drawing the same box from multiple angles, in one-point and two-point perspective — fix this faster than almost anything else.
Avoiding difficult subjects. Hands, faces, complex poses — these are the subjects most beginners avoid because they’re hard. That’s exactly why they should be practiced most. Regular exposure to difficult subjects builds the technical range that makes easier subjects genuinely easy.
Watching without practicing. Tutorials create the illusion of learning. The test of whether you’ve actually absorbed something is whether you can apply it in a sketch immediately afterward. Watch less, draw more.
Expecting fast results. Drawing skill accumulates slowly and then — after months of consistent work — seems to improve quickly. Most of the growth is happening beneath the surface before it becomes visible. Trust the process and track weekly progress rather than looking for daily breakthroughs.
FAQ About ( How to Improve Drawing Skills )
How can I improve my drawing skills fast?
Focus on fundamentals and daily practice. Short, focused sessions on shapes, proportions, perspective, and shading create faster improvement than random or tutorial-heavy practice.
How many hours a day should I practice drawing?
Fifteen to thirty minutes daily is enough to build steady improvement. Consistency matters far more than session length.
Can adults still learn to draw well?
Absolutely. Observation and repetition matter more than age. Many people develop strong drawing skills starting in adulthood.
What should beginners practice first?
Basic shapes, line control, and proportions. These fundamentals support everything that comes after — anatomy, perspective, realistic shading, and beyond.
Why do my drawings still look bad after practicing?
Usually because practice isn’t targeting the right things. Unfocused repetition can reinforce mistakes rather than correct them. Add observation exercises and specific fundamentals drills to your routine.
Is drawing from reference cheating?
No — professional illustrators use references constantly. The key is using them to understand structure and proportion, not just to copy an outline.
How long does it take to become good at drawing?
Most beginners see meaningful improvement within a few months of consistent, focused practice. Strong foundational skills typically take a year or more to develop fully.
What are the best exercises to improve sketching?
Gesture drawing, real-life observation studies, timed sketching, and perspective exercises. Blind contour drawing is also highly effective for training accurate observation.
Final Thoughts
Improving at drawing isn’t mysterious. It follows the same logic as any other skill: deliberate practice, honest assessment of weak areas, and enough repetition to build visual memory and muscle memory over time.
The fundamentals — shapes, proportions, line quality, light and shadow, perspective — don’t become less important as you advance. Professional artists revisit them constantly. Building them early creates a foundation that every other technique grows from.
Draw daily, even briefly. Study observation as seriously as technique. Keep your old sketches and compare them honestly. Focus on one skill at a time rather than trying to improve everything simultaneously. Progress in drawing is always gradual — and then, suddenly, obvious.