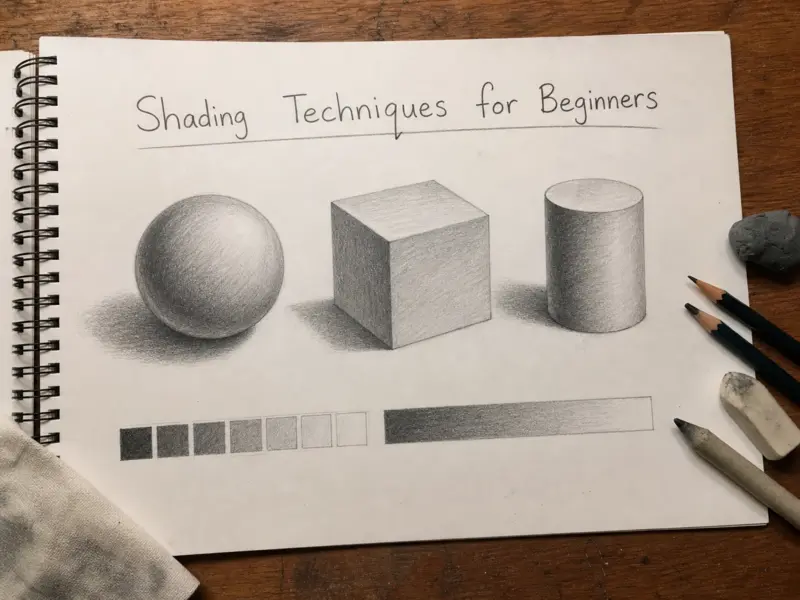
Shading Techniques for Beginners: A Step-by-Step Guide
Flat drawings look lifeless. Good shading fixes that fast. Shading adds depth, form, texture, and realism to your art. Even simple sketches can look three-dimensional with the right technique. Most beginners struggle because they focus on darkening areas randomly. Real shading starts with understanding light, values, and control.
This guide will show you:
- How light and shadow actually work
- The easiest shading techniques for beginners
- Step-by-step exercises that improve fast
- Common mistakes that ruin shading
- A practice system most tutorials ignore
You do not need expensive tools. A pencil, paper, and steady practice are enough.
Understanding Light and Shadow First
Before learning techniques, you must understand why shadows appear. Every object reacts to light in the same basic way. Once you learn this pattern, shading becomes much easier.
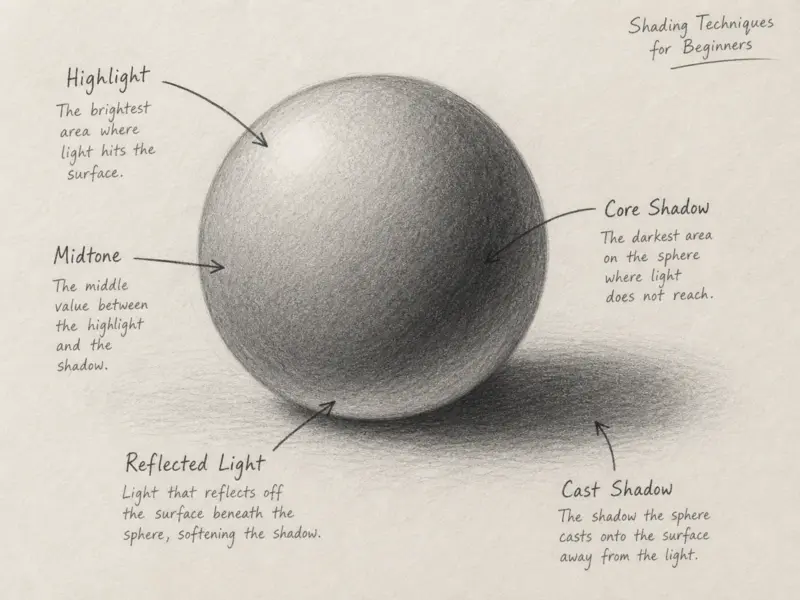
The 5 Parts of Basic Shading
1. Highlight
This is the brightest area. Light hits this part directly. Do not shade this section heavily. Leave the paper mostly white.
2. Midtone
This area receives some light but not full brightness. Use soft, even shading here.
3. Core Shadow
This is the darkest area on the object itself. It sits opposite the light source. Press harder with your pencil here.
4. Reflected Light
Light bounces back into the shadow side. Many beginners make shadows completely black. Real objects usually have a soft reflected glow.
5. Cast Shadow
This shadow falls onto the surface below the object. Cast shadows become softer as they move away from the object.
Simple Exercise: Shade a Sphere
This exercise teaches almost every shading skill.
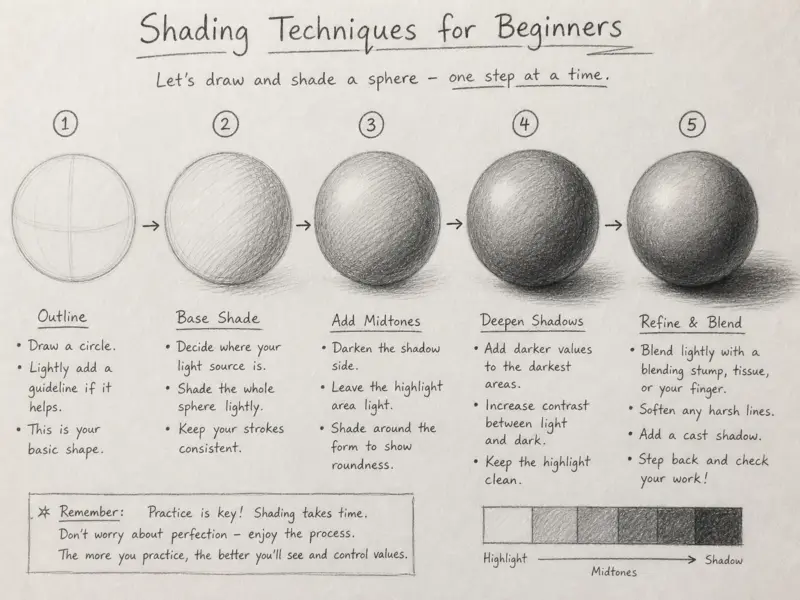
Step 1: Draw the Circle
Draw a clean circle lightly. Place an imaginary light source above the sphere on one side.
Step 2: Mark the Highlight
Choose the brightest area. Leave this section untouched.
Step 3: Add Midtones
Use light pencil pressure. Move your pencil in small, controlled strokes around the sphere.
Step 4: Build the Core Shadow
Darken the side opposite the light. Blend slowly into the midtones.
Step 5: Draw the Cast Shadow
Create an oval shadow beneath the sphere. Make the area closest to the sphere darkest.
This one exercise improves:
- Pencil control
- Light understanding
- Value transitions
- Blending skills
Practice it daily for one week.
5 Beginner Shading Techniques You Should Master
You do not need dozens of techniques. Start with these five.
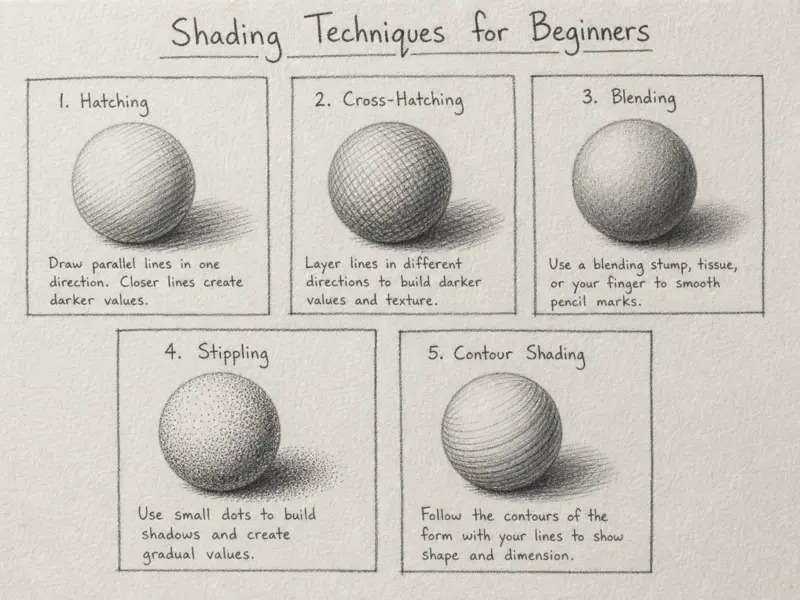
1. Hatching
Hatching uses parallel lines to create value.
How to Do It
- Draw lines in one direction
- Keep spacing even
- Place lines closer together for darker values
- Spread lines apart for lighter areas
Best Use
- Quick sketches
- Comic art
- Architectural drawing
Beginner Mistake
Random line spacing creates messy shading. Focus on rhythm and consistency.
2. Cross-Hatching
Cross-hatching adds another layer of lines over hatching.
How to Practice It
- Draw one layer of parallel lines
- Add another layer crossing the first
- Add more layers for darker shadows
Important Tip
Change line direction slightly with each layer. This creates smoother texture.
Best Use
- Portraits
- Dramatic shadows
- Detailed sketches
3. Blending
Blending creates smooth transitions between light and dark.
Step-by-Step Blending Exercise
- Draw a rectangle
- Shade one side dark
- Gradually reduce pencil pressure
- Fade into white space
Tools You Can Use
- Blending stump
- Tissue paper
- Cotton swab
- Finger blending
Common Problem
Over-blending destroys texture. Keep some pencil grain visible.
4. Stippling
Stippling uses dots instead of lines.
How It Works
- More dots = darker value
- Fewer dots = lighter value
Best Practice Method
Start with small areas first. Large stippling drawings take time and patience.
Best Use
- Ink drawings
- Texture work
- Stylized illustrations
5. Contour Shading
Contour shading follows the shape of the object. Instead of straight lines, your strokes curve around the form.
How to Practice
Shade a cylinder using curved strokes. Wrap the pencil marks around the object like rubber bands.
Why It Helps
Contour shading instantly creates depth. Objects feel round instead of flat.
How to Make Shading Look Realistic
Good realism comes from value control, not expensive tools.
Control Pencil Pressure
Most beginners press too hard too early. Start lightly. Build darker layers slowly.
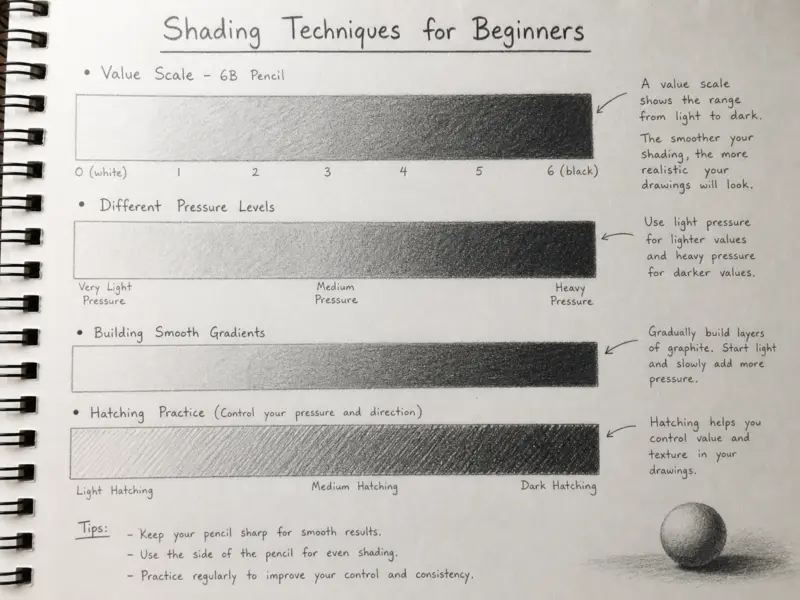
Practice Drill
Create a value scale from 1 to 10:
- 1 = almost white
- 10 = darkest black
Try to make every step slightly darker than the last. This trains your hand control fast.
Use More Than One Pencil
Different pencils create different values.
Beginner Pencil Setup
- HB for sketching
- 2B for midtones
- 4B or 6B for dark shadows
Soft pencils create smoother dark areas.
Watch Your Edges
Not every shadow edge should look sharp.
Sharp Edges
Use for:
- Strong lighting
- Hard surfaces
- Objects close to the viewer
Soft Edges
Use for:
- Skin
- Fabric
- Distant objects
Soft edges create realism.
Avoid Muddy Shading
Muddy shading happens when tones blend into one gray mess.
Fix It Like This
- Keep highlights clean
- Increase contrast
- Separate light from shadow clearly
- Do not smudge everything
Clean value separation makes drawings pop.
7-Day Shading Practice Plan for Beginners
Most tutorials teach techniques but ignore structured practice. This plan fixes that.
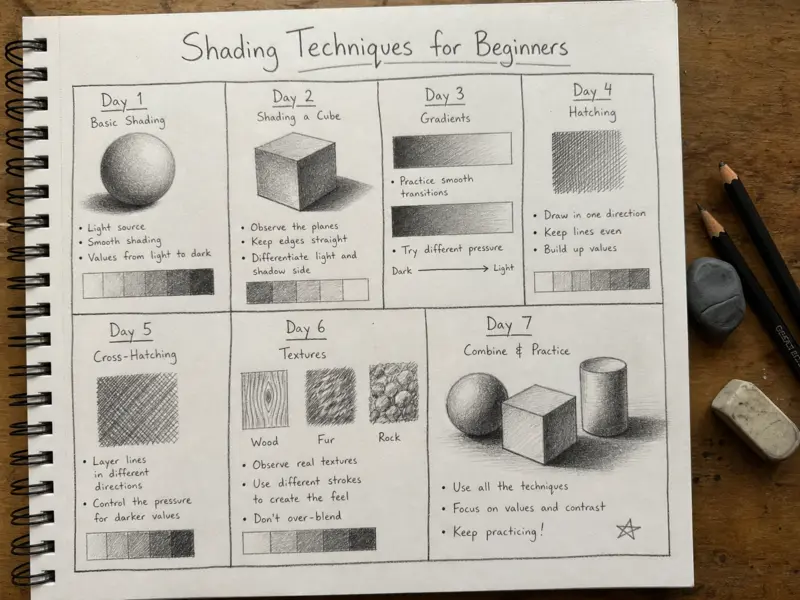
Day 1: Straight Line Control
Fill a page with parallel lines. Focus on spacing and smooth motion.
Day 2: Value Scales
Create five value scales. Train your pressure control.
Day 3: Hatching and Cross-Hatching
Shade cubes and rectangles using line techniques only. Avoid blending.
Day 4: Blending Practice
Create smooth gradients from dark to light. Blend carefully without over-smudging.
Day 5: Sphere Shading
Shade five spheres from different light directions. Focus on realistic transitions.
Day 6: Texture Study
Shade:
- Metal
- Wood
- Fabric
- Skin
Each texture needs different edges and values.
Day 7: Full Object Drawing
Choose one simple object:
- Apple
- Mug
- Bottle
Use everything you practiced during the week. Repeat this cycle for one month. Your control improves much faster with structured repetition.
The Most Overlooked Shading Skill
Most shading tutorials focus only on pencil techniques. They ignore observation training. Your eyes matter more than your tools.
Learn to See Values Correctly
Beginners often draw what they think they see. Artists draw actual light shapes.
Simple Observation Exercise
Look at an object under strong lighting. Squint your eyes slightly. This removes detail and reveals basic light and shadow patterns. Now draw only the big value shapes first. Do not start with tiny details. This method improves realism faster than endless shading drills.
FAQ About Shading Techniques for Beginners
What is the easiest shading technique for beginners?
Blending is usually easiest for beginners. It creates smooth gradients and helps you understand light transitions quickly.
How long does it take to learn shading?
Most beginners see clear improvement within two to four weeks of daily practice.
What pencils are best for shading?
HB, 2B, and 4B pencils work well for beginners. They provide a good range of values.
Why does my shading look flat?
Flat shading usually comes from weak contrast. Your dark areas are not dark enough, or your highlights are too dull.
Should beginners blend with fingers?
You can, but blending stumps give cleaner results. Fingers often create oily, muddy shading.
Conclusion About Shading Techniques for Beginners
Shading is not about making areas darker. It is about controlling light, values, edges, and transitions. Start with simple forms first. Practice spheres, cubes, and cylinders before complex subjects.
Focus on:
- Light direction
- Smooth value changes
- Pencil pressure control
- Clean highlights
- Strong contrast
Use the 7-day practice plan consistently. One focused month of practice will improve your drawings more than years of random sketching.