🍎 Apple Drawing: The Complete Beginner-to-Realistic Guide
Fruit is one of the most common subjects in beginner drawing classes, and apples are the most common fruit used. The reason is straightforward — an apple has enough shape complexity to teach real skills without being overwhelming. Drawing an apple well requires you to manage light, shadow, proportion, and surface texture at the same time. Each of those is a fundamental drawing skill. Getting them right on a simple object first makes them easier to apply later on more complex subjects.
This guide covers the full process — from a basic beginner sketch to realistic shading, 3D form, color, and creative variations.
Why Apple Drawing Is the Perfect Starting Point
An apple teaches several skills that apply directly to other subjects. The rounded form is similar to cups, oranges, and the basic structure of a human head. Learning to shade a sphere — which is what an apple essentially is — transfers to almost any round object you draw later.
The surface also reflects light in a predictable way. You can clearly see where the highlight sits, where the shadow falls, and where reflected light creates a lighter edge near the darkest area. These five zones of light and shadow appear on almost every 3D object. An apple is simply a clean, accessible way to practice reading them. It also stays still, which matters more than it sounds. Drawing from observation is harder when the subject moves. An apple gives you as much time as you need.
✏️ Before You Start: Tools and Setup
You do not need expensive supplies to draw a strong apple. You need simple tools and clear focus. Start with an HB pencil. It creates light, clean lines. Use it for sketching the basic shape. Add a 2B pencil. It gives darker shadows. It helps you build depth. These two pencils are enough. Many beginners think they need a full set. You do not. Control matters more than quantity. Choose a sketchbook or good drawing paper. Smooth paper makes blending easier. Rough paper adds texture. It gives balance between detail and softness.
Keep a soft eraser beside you. Use it gently. You can lift graphite to create highlights. An eraser is not just for mistakes. It is part of the drawing process. A blending stump helps smooth shading. It is optional. You can blend with light pencil strokes instead. If you want to explore more, try colored pencils. They help you study red and green tones. Charcoal creates dramatic contrast. Watercolor adds softness and transparency. Digital artists can use Procreate, Adobe Illustrator, or Adobe Photoshop. The tools change, but the principles stay the same.
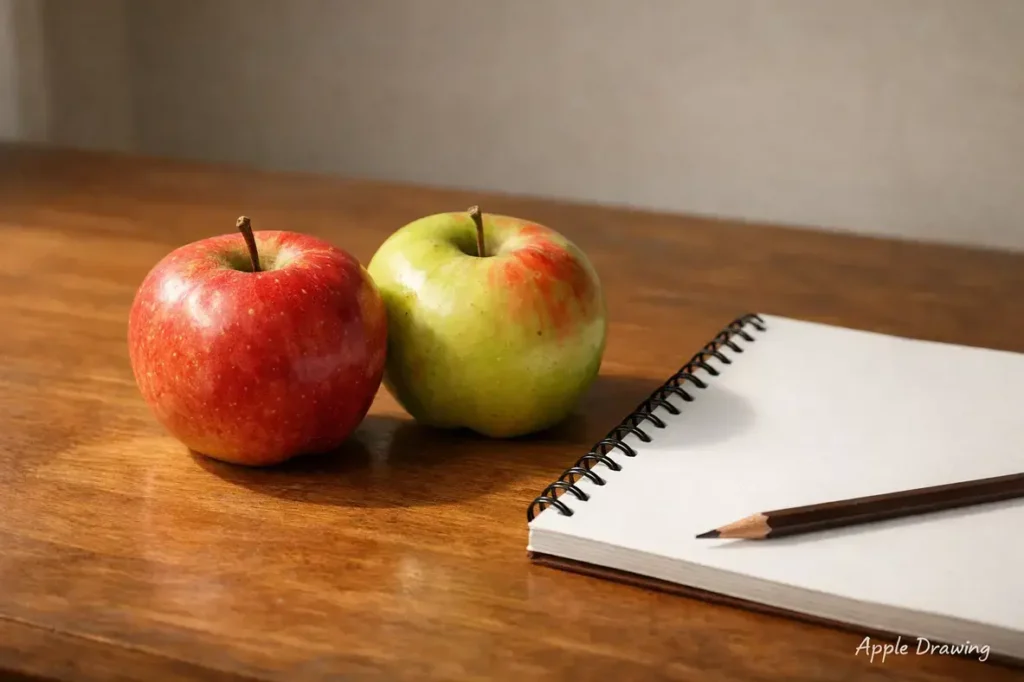
Now prepare your space. Clear your desk. Sit comfortably. Rest your arm on the table for stability. Lighting matters most. Place a real apple under one strong light source. Use a desk lamp from one side. Avoid overhead room lighting. Side light creates visible shadows. Natural window light works beautifully. Morning light feels soft. Evening light creates stronger contrast. Watch how the highlight forms. Notice where the shadow touches the table. That observation will guide your pencil. Keep your setup simple. Focus on seeing clearly. The apple will teach you the rest.
🍎 Easy Apple Drawing: Beginner Step-by-Step
Drawing an apple feels simple. Doing it well feels powerful. Let’s build it step by step.
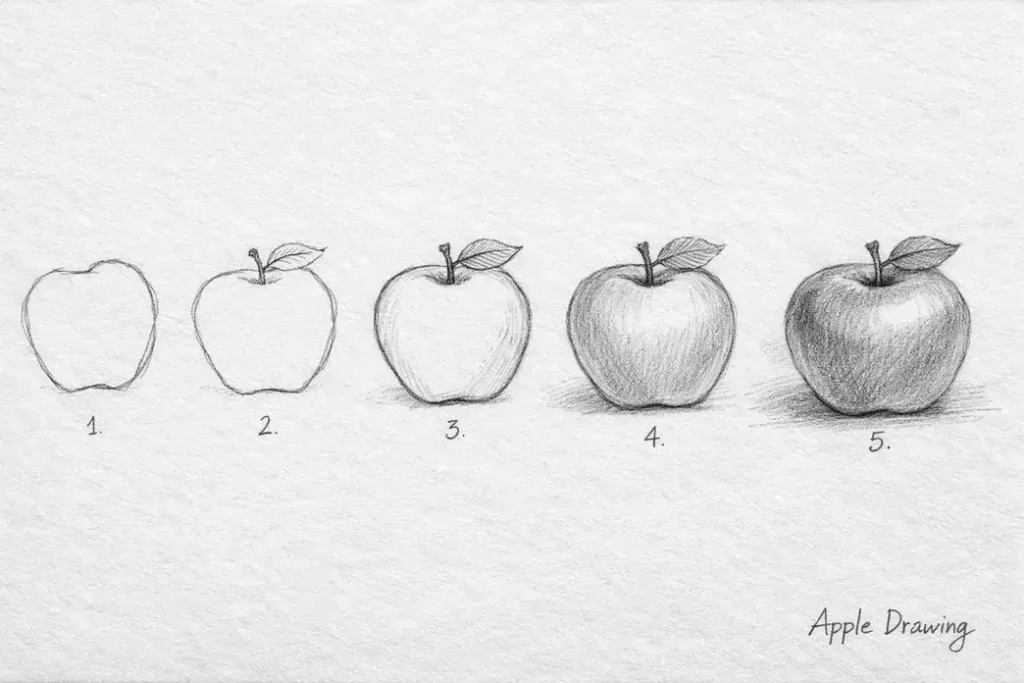
Step 1 – Draw the Basic Shape
Start with a loose circle. Keep your hand relaxed. Do not press hard. Now look closely at a real apple. It is never a perfect circle. One side often rises slightly higher. The bottom may dip inward. Add a soft bump on one side. Flatten the top just a little. These small changes create realism. Natural objects carry asymmetry. That uneven balance makes them believable.
Step 2 – Add the Stem and Leaf
Place the stem slightly off center. Centered stems look artificial. Draw a short, narrow rectangle shape. Let it tilt gently. Straight vertical stems feel stiff. If you add a leaf, keep it proportional. It should not overpower the apple. Attach it at the stem base. Watch the angle. Leaves often curve upward toward light.
Step 3 – Refine the Outline
Now go over your sketch lightly. Smooth out rough lines. Remove extra marks carefully. Avoid sharp edges. Apples have soft curves. Use long, flowing strokes. Move from your elbow, not just your wrist. This creates organic curves. Your outline should feel alive, not mechanical.
Step 4 – Basic Shading
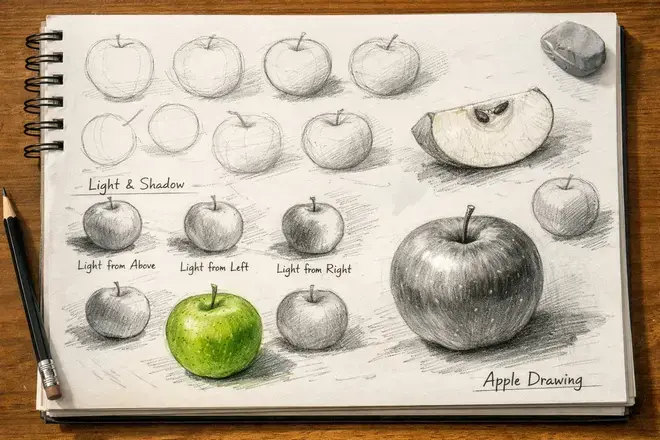
Choose your light source. Imagine light coming from one side only. Leave the brightest area untouched. That space becomes your highlight. Start shading the opposite side. Use light pressure first. Build darkness slowly. Darken the area farthest from light. That area forms the core shadow. Let the tones blend smoothly. Do not shade everything evenly. Contrast creates depth.
Step 5 – Add Cast Shadow
Draw a shadow under the apple. Place it opposite the light direction. Keep it darkest near the apple. Fade it as it moves outward. This shadow anchors the apple. Without it, the apple floats. Step back and observe. You now have form, light, and depth. You turned a simple shape into something real. That is the power of apple drawing.
🎨 How to Shade an Apple Like a Real Artist
Shading turns a flat circle into a solid form. Without shading, your apple looks like a symbol. With shading, it feels real and touchable. Everything begins with light. Choose one clear light source. Do not guess. Decide it. Look at a real apple under a lamp. You will see five clear zones. These zones create depth. First comes the highlight. This is the brightest spot. Light hits here directly. Do not shade this area. Protect it from the start. Next comes the midtone. This area sits between light and shadow. It carries soft, gentle shading. Use light pressure here.
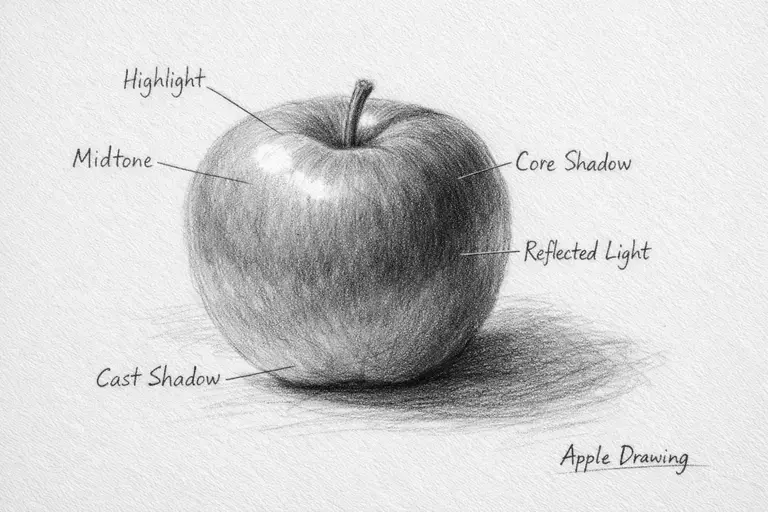
Then comes the core shadow. This is the darkest part on the apple’s surface. It sits opposite the light source. It wraps around the curve. Press slightly harder, but stay controlled. Now notice something subtle. Right near the edge of the shadow, a thin lighter strip appears. This is reflected light. Light bounces from the table back onto the apple. It softens the darkness. Many beginners miss this detail. That small glow adds realism. Finally, draw the cast shadow on the table. It falls away from the light. It looks darkest near the apple. It softens as it stretches outward.
Think in this order:
Light → Midtone → Core Shadow → Reflected Light → Cast Shadow. For a deeper understanding of light and shadow theory, Ctrl+Paint offers free beginner-friendly video lessons on shading fundamentals.
Blend carefully. Use small circular motions with your pencil. Layer graphite slowly. Avoid heavy blending too early. Slow layers create smooth depth. Common mistakes appear often. Shading the whole apple evenly. Ignoring the highlight. Making the shadow flat and gray. Forgetting reflected light. Strong shading follows structure. It respects light direction. It builds contrast with patience. When you shade with intention, the apple feels round. It gains weight. It sits firmly on the page. That is when drawing becomes art.
🍏 Realistic Apple Drawing Tutorial
A realistic apple demands patience and sharp observation. At this level, shape alone is not enough. You must study texture, depth, and subtle light shifts. Start by observing the surface closely. An apple skin looks smooth from far away. Up close, it shows tiny dots and faint streaks. These details create authenticity. Build the 3D form first. Think of the apple as a sphere with gentle irregular curves. Your shading must wrap around that form. Do not shade in straight lines. Follow the curve of the surface. Layer graphite slowly. Begin with light pressure. Add tone in thin layers. Deep shadows come from stacking layers, not pressing hard once. This creates richness without shine.
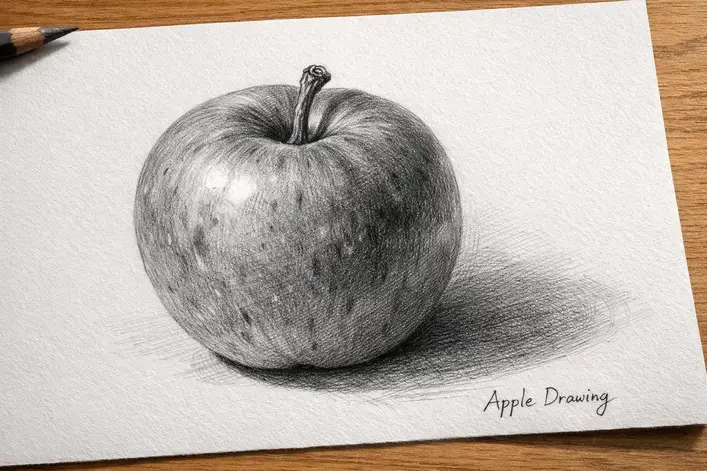
Now add surface imperfections. Real apples carry small marks. You may see tiny specks, soft bruises, or faint color shifts. Place them carefully. Keep them subtle. Too many details create noise. Pay attention to color variation. A red apple rarely shows one flat red tone. It carries hints of yellow near highlights. It shows deeper crimson near shadows. A green apple may reflect cool blue in darker areas. These shifts create life. Use cross-hatching for stronger depth. Let the lines follow the form. Keep spacing tight in dark areas. Loosen spacing in midtones. Texture rendering requires control. Tap lightly with the pencil tip to create speckled skin. Lift tiny highlights with an eraser. These small contrasts add realism.
Focus on the stem. Add wood texture with short vertical strokes. Darken the base where it meets the apple. This area usually holds strong shadow. Observe subtle highlight reflections. A bright spot often shows sharp edges. It may reflect a window shape or light bulb glow. Keep it clean and precise. Realism comes from observation and control. Slow down. Study carefully. Let the apple reveal its details.
🍎 3D Apple Drawing Explained (Form and Perspective)
An apple is a sphere with personality. It follows the rules of a ball, but it keeps its own shape. The top dips inward near the stem. The sides curve outward with softness. The bottom often flattens slightly where it rests. These subtle shifts give it character. When you draw in 3D, think beyond the outline. See the apple as a solid mass in space. Imagine wrapping your hand around it. Feel its roundness before shading it. Form comes from light direction. Place a lamp on the left side. The left surface glows. The right side darkens gradually. Move the lamp higher. The highlight climbs upward.
The shadow shortens and tightens. Lower the light source. The shadow stretches longer across the table. These small changes reshape the apple completely. Rotating the apple while observing it is a useful habit. Watching light shift across the surface helps you predict where shadow will fall before you draw it. Angle changes everything. Look at the apple straight on. You see balanced curves. Look from above. The top indentation becomes visible. Look from a lower angle. The apple feels taller and heavier. Perspective decides how much of the top and bottom you reveal. Now compare two situations. Place the apple on a table. It creates a cast shadow beneath it. That shadow anchors it to reality. It shows weight and contact.
Now imagine the apple floating. There is no surface below. The shading must carry the illusion alone. The lower half often darkens to suggest volume. Without a cast shadow, depth depends entirely on smooth tonal transition. Understanding form and perspective changes everything. You stop copying shapes. You begin constructing objects. The apple becomes a study of space, not just fruit.
🍎 Apple Drawing Ideas
Once you understand the basic form, creativity opens up. An apple becomes more than a study object. It becomes a character, a symbol, a story. Start with cute and cartoon ideas. Draw an apple with a smiling face. Add simple oval eyes and soft cheeks. Give it tiny arms and legs. Children connect instantly with this style. Try a kawaii apple drawing. Keep the eyes large and sparkling. Make the mouth small and centered. Add a tiny blush on both sides. The soft curves create charm and warmth. Create a school-themed apple. Place a small graduation cap on top. Add glasses and a book beside it. This idea works beautifully for classroom projects.

Now explore style variations. Draw a black and white line art apple. Focus only on contour and inner detail lines. No shading. Only structure. This sharpens your control. Try a minimalist apple. Use one continuous clean outline. Add a single shadow shape. Let simplicity carry the design. Experiment with watercolor apple painting. Let the color bleed softly near the edges. Allow natural gradients to form. Watercolor adds freshness and movement. Create a digital apple illustration using Procreate or Adobe Photoshop. Use textured brushes. Layer soft highlights. Play with bold color contrast.
Scene-based ideas bring depth. Draw an apple slice with visible seeds. Show the inner texture clearly. Create a bitten apple with curved bite marks. Add subtle tooth impressions for realism. Sketch an apple inside a fruit basket. Let overlapping shapes create dimension. Or draw an apple tree full of fruit. Use smaller apples in the distance for perspective. Drawing three versions of the same apple in one session — realistic, cartoon, and minimal — is a useful exercise. Each style isolates a different skill and shows how approach changes the result. Creativity grows when you explore variety. The apple becomes a playground for imagination.
🍎 Apple Drawing for Kids and School Projects
Children connect with simple shapes. An apple makes the perfect starting subject. For kindergarten level, break the apple into two parts. Draw a large round shape. Add a small curved line at the top. Then place a short stem. Keep lines bold and clear. Avoid complex shading. Use flat color instead. Bright red or green works best. Children respond to strong, simple tones. For a printable outline version, draw a clean thick contour. Leave the inside empty. This becomes a coloring page. Kids can experiment with crayons, markers, or colored pencils. Encourage them to add personality. Small eyes. A smile. A tiny leaf waving like a hand. This builds creativity and confidence.
For school art assignments, teachers often ask for themed drawings. An apple can represent knowledge. Add a book beside it. Draw a chalkboard in the background. Write a simple word like “Learn.” Keep shapes large and easy to fill.Children focus more easily when the task feels achievable. Simple shapes with clear outlines keep young students engaged and reduce frustration.
🎨 Still Life Apple Drawing (Art School Foundation)
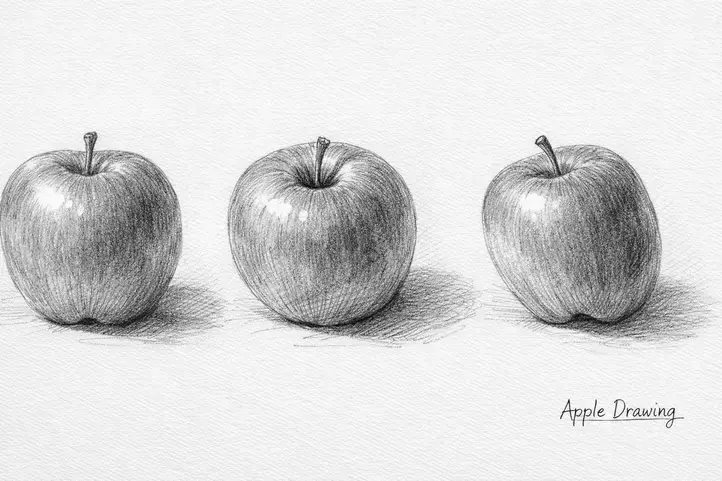
Still life art focuses on everyday objects. Artists arrange objects and study them carefully. This practice trains observation and control. Art schools use apples for a reason. They teach light, form, and composition at once. Simple objects reveal complex lessons. Set up one apple on a table. Place a single light source from one side. Observe quietly before drawing. Notice the shadow shape. Study the highlight placement. For stronger composition, add two more apples. Place one slightly behind the other. Overlap them gently. This creates depth and perspective. Vary the spacing. Keep one closer to the viewer. Push one slightly back. Smaller size suggests distance.
Add a cloth under the apples if you want complexity. Folds create extra shadow patterns. They challenge your observation skills. Practicing with the same setup over several days reveals how much light changes between sessions. Those shifts sharpen observation faster than switching subjects.Still life drawing builds patience. It trains your eye to see relationships between objects. It teaches balance and arrangement. An apple in still life is not just fruit. It becomes structure, shadow, and space working together.
Apple Drawing Practice Plan
Skill grows with structure. Random practice feels slow. Focused practice builds momentum. Here is a simple 7-day apple drawing plan. Each day has one clear goal. Stay consistent. Stay honest with your effort.
Day 1 – Basic Outline
Draw five apple outlines. Do not shade them. Focus only on shape. Make each apple slightly different. Some wider. Some taller. Train your eye to see natural asymmetry.
Day 2 – Shading Practice
Choose your best outline from Day 1. Add light and shadow. Decide the light direction first. Build highlight, midtone, and core shadow carefully. Add a cast shadow under the apple. Study how depth appears from contrast.
Day 3 – Red Apple Color Study
Use colored pencils or paint. Observe a real red apple closely. Notice yellow near the highlight. Notice deeper crimson in shadow. Layer color slowly. Avoid flat red fill.
Day 4 – Green Apple Variation
Draw a green apple from a new angle. Compare it to the red one. Look for cool tones in shadow. See how green shifts toward blue in darker areas. This builds color awareness.
Day 5 – Apple Slice
Cut an apple and draw the inside. Focus on symmetry. Observe seeds and inner texture. Shade the flesh softly. Add subtle moisture shine.
Day 6 – Still Life Setup
Arrange two or three apples on a table. Use one light source. Study overlapping shapes. Control spacing and proportion. Add shadows carefully.
Day 7 – Realistic Final Piece
Take your time. Use everything you learned. Build layers slowly. Add texture and subtle highlights. Refine the stem and shadow.
By the end of seven days, you will see progress clearly. Your hand will feel steadier. Your shading will feel intentional. Your apple will look solid and alive.
Common Mistakes Beginners Make About Apple Drawing
Every beginner makes mistakes. Mistakes do not mean failure. They reveal what needs attention. The first common mistake is drawing a perfect circle. An apple is not a geometric shape. Perfect symmetry makes it look artificial. Real apples have soft bumps and slight dips. Let the outline feel natural, not mechanical. The second mistake is over-blending. Many beginners smudge too much. They try to make everything smooth. Over-blending kills contrast.
It turns the apple flat and lifeless. Keep some texture.
Let pencil strokes follow the curve of the form. Ignoring light direction creates confusion. Light must come from one clear source. If highlights appear on both sides, the form breaks. Decide where the light sits before shading. Stay consistent from start to finish. Another common issue is forgetting the cast shadow. Without it, the apple floats in space. A cast shadow anchors the object. It shows weight and contact with the surface. Keep it darker near the apple. Fade it gently outward. Many beginners go too dark too soon. They press hard in early stages. This makes correction difficult. Build tone slowly in layers. Gradual shading creates depth and control.
Most of these mistakes correct themselves once you slow down and observe the light source before picking up the pencil. Awareness fixes most problems. Small adjustments create big improvement. The goal is not perfection. The goal is steady progress with intention.
Apple Drawing Reference and Practice Resources
Strong drawing begins with strong observation. A good reference guides your eye. A poor reference confuses it. When using a photo reference, study it carefully. Do not copy blindly. Ask simple questions. Where does the light come from? Where is the darkest shadow? What shape does the highlight create?
Zoom in on details. Look at the edge transitions. Notice how the shadow wraps around the curve. Focus on structure before texture. Practicing from a real apple builds deeper understanding. A real object shows subtle color shifts. It reveals reflected light clearly. It changes slightly as you move around it. That movement trains spatial awareness. Place the apple under one lamp. Sit still and observe for a minute. Notice tiny surface spots. Study the stem’s texture. Look at how the shadow connects to the table. Creating your own reference photos gives you control. Use your phone camera. Place the apple near a window. Take photos from different angles. Try high light and low light conditions. Compare the differences later.
Photographing the same apple at different times of day — morning, afternoon, evening — shows clearly how much light conditions affect shadow placement and surface tone. Add fruit drawing exercises to your routine. Draw apples next to oranges. Compare textures and highlights. Sketch quick one-minute studies. Then attempt a longer detailed version. Practice contour-only drawings without shading. Then practice shading without outlines. Each method strengthens observation. References are tools, not shortcuts. Use them to understand form and light. With time, your eye will recognize structure faster. That awareness stays with you beyond the apple.
FAQ About Apple Drawing
How do you draw an apple step by step?
Start with a loose round shape. Add a small dip at the top for the stem area. Draw a short angled stem and optional leaf. Decide your light source and leave a small highlight area. Shade the opposite side gradually and add a cast shadow under the apple.
What is the easiest way to draw an apple?
Draw a soft circle with slight uneven curves. Add a simple stem on top. Shade one side lightly and keep the other side bright. Add a small shadow beneath it. Keep lines clean and avoid too much detail.
How do you shade an apple realistically?
First, identify the light source. Leave the highlight untouched. Shade the midtone gently across the curved surface. Deepen the core shadow on the side opposite the light. Add a thin strip of reflected light near the shadow edge. Finish with a cast shadow on the table. Follow this order: Light → Midtone → Core Shadow → Reflected Light → Cast Shadow.
Is apple drawing good for beginners?
Yes, it builds strong fundamentals. An apple teaches form, shading, and light control in one subject. It helps beginners understand depth without complex shapes. Small success with an apple boosts confidence quickly.
How do you draw a red apple with color?
Start with a light base layer of red. Add yellow near the highlight area. Deepen the shadow side with darker red or crimson tones. Blend softly but keep contrast visible. Leave the highlight clean for a natural shine effect.
Final Thoughts: Why Mastering Apple Drawing Changes Everything
The apple is useful precisely because it is simple enough to repeat. Drawing one apple tells you very little. Drawing ten apples over a week tells you exactly where your proportion, shading, and line control need work. The skills that come from apple drawing — reading light, building tone in layers, understanding form — apply directly to more complex subjects. Cups, bowls, and rounded faces all follow the same light logic. Getting it right on an apple first makes those subjects noticeably easier. Draw three apples today at different angles. Note what changes between them. That comparison is where most of the learning happens.