Face Drawing: Complete Beginner Guide to Drawing Faces Step by Step
Introduction
Face drawing is one of the most common challenges beginners encounter. The human face follows specific proportions. Small placement errors change the expression. Most early mistakes come from skipping structure and moving directly to details.
This guide explains head shape, proportions, shading, and common mistakes.
What Is Face Drawing?
Face drawing means creating a visual representation of a human face using lines, shapes, and shading.
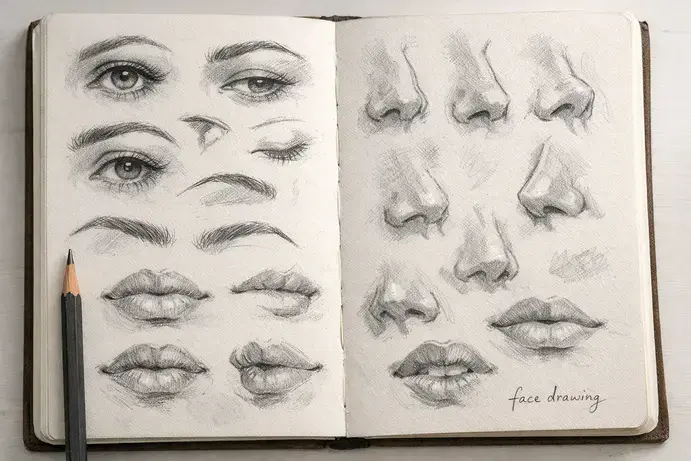
Artists capture facial features such as:
Simple sketches focus on basic shapes and proportions. A detailed portrait may include complex shading and texture. Both belong to the art of face drawing. Face drawing depends more on observation than talent. Artists study real faces carefully. They observe how the eyes align with the ears. They notice how the jaw curves under the cheekbones. These small observations create believable drawings.
Face Drawing vs Portrait Drawing
Face drawing focuses on practice and structure. Artists study shapes and proportions. These sketches often look simple or loose. Portrait drawing focuses on likeness. The goal is to capture a real person accurately. Artists study details like jaw shape, eye spacing, and expression.
Early practice sketches often look generic. They show a face but lack identity. Adding unique features improves likeness. Portrait work requires careful observation and patience. Face drawing builds structure. Portrait drawing builds identity and detail.
Why the Human Face Is Hard to Draw
The human face contains complex shapes and subtle details. Small changes can alter expression. A slight shift in eye position changes emotion. A small change in lip curve affects appearance.
Humans recognize faces quickly, so small errors stand out. Artists study facial anatomy to improve accuracy. They focus on skull structure, muscles, and light. Understanding structure makes drawing more manageable.
Why Learning Face Structure Improves All Drawing Skills
Drawing faces improves core art skills. It develops observation, proportion control, and shading ability. It also improves hand coordination. The face includes curves, angles, and value changes. Practicing these elements improves control. Artists use portrait studies to train accuracy. Repeated practice improves visual judgment. Facial sketching builds a strong foundation for other subjects.
The Basic Structure of the Human Face
Every strong face drawing starts with structure. Many beginners draw details too early. This causes uneven results. The face follows a clear framework. The skull shapes the head. Bones define the forehead and jaw. Muscles control expression. Understanding this structure improves accuracy. Artists study basic shapes before adding details. This approach keeps features aligned and proportional.
Understanding Face Proportions
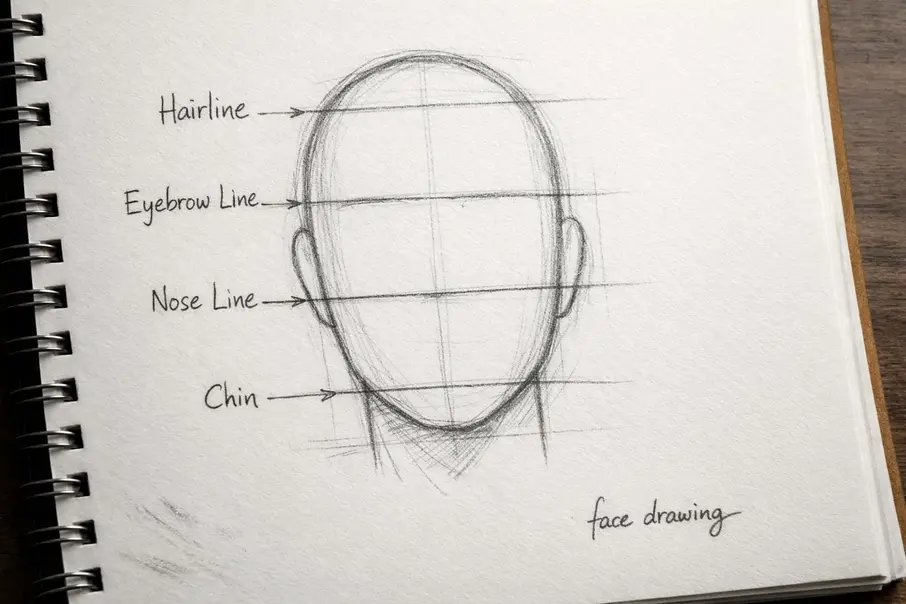
Facial proportions guide feature placement.
A common method divides the face into three equal parts:
Most faces fit five eye widths across. The eyes sit in the middle area. Beginners often place eyes too high. Correct placement improves balance. These guidelines provide a reliable starting point. Adjustments refine accuracy.
Essential Tools for Face Drawing
Simple tools work well for face drawing. Many beginners delay practice due to equipment concerns. This is unnecessary. Basic tools provide full control and flexibility. Skill develops through consistent use.
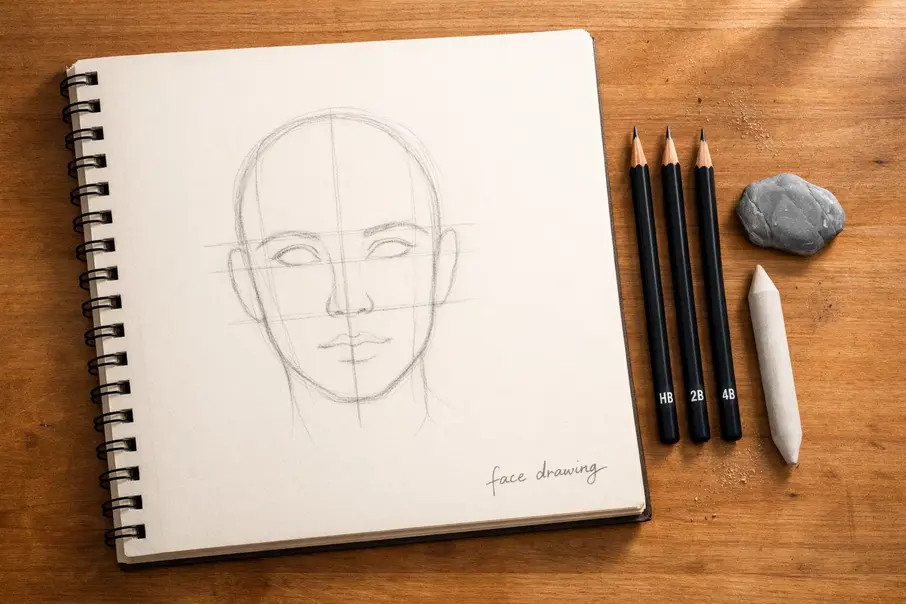
Basic drawing tools include:
These tools help create clean lines and smooth shading.
Step-by-Step Face Drawing for Beginners
A clear process helps beginners avoid confusion. Follow these simple steps.
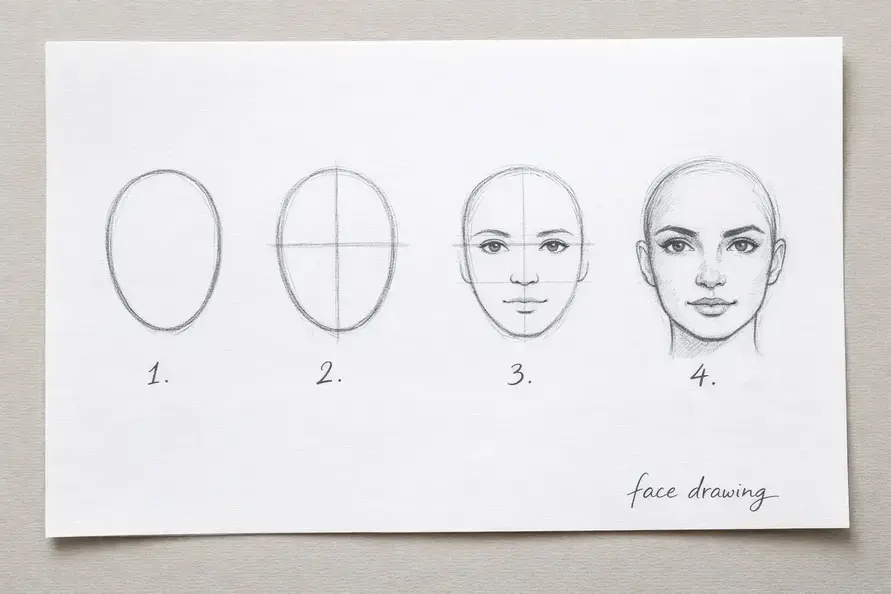
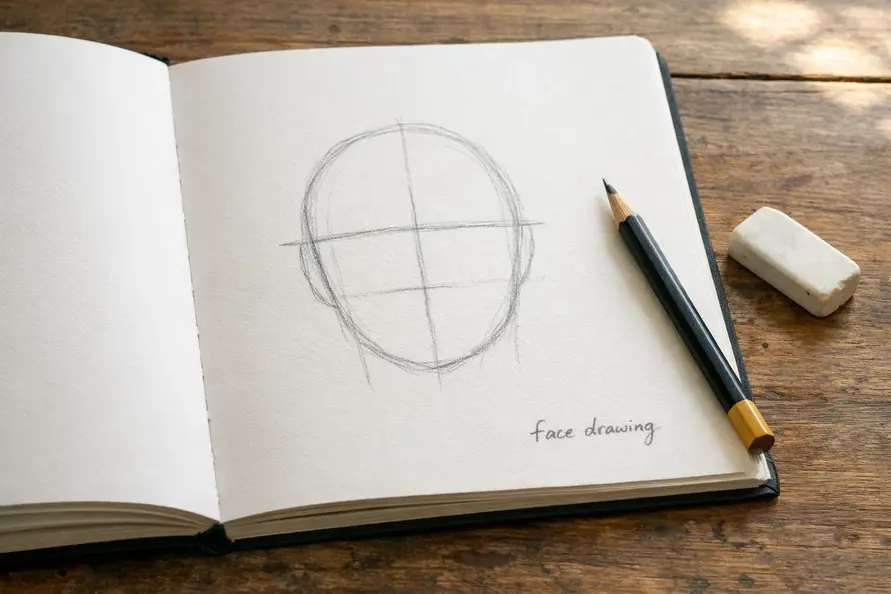
Step 1: Draw the Head Shape
Start with a light oval shape. Keep lines loose and light. The oval provides a foundation for the face.
Step 2: Add Guidelines
Draw a vertical center line. This line divides the face into two halves. Next, draw a horizontal line across the middle. This marks the eye position.
Step 3: Place the Eyes
Imagine five eye widths across the face. Draw the eyes in the middle three spaces. Keep shapes simple at first.
Step 4: Draw the Nose
Place the nose between the eye line and the chin. Sketch the bridge and base lightly. Avoid strong outlines.
Step 5: Draw the Mouth
The mouth usually aligns with the center of the eyes. Start with a soft curve for the upper lip. Add the fuller lower lip.
Step 6: Add Ears and Hairline
Ears align roughly with the eyes and nose. Sketch the hairline above the forehead.
Step 7: Refine the Face Shape
Adjust the jawline and chin. Check proportions carefully.
Step 8: Add Shading
Shading creates depth. Add shadows under the nose, lips, and jawline. Gradual shading makes the face look realistic.
Face Drawing Techniques Used by Artists
Artists use different techniques to study the face. These methods train observation and line control.
Sketching
Sketching uses quick loose lines. It helps artists explore shapes and proportions. Daily sketching builds confidence.
Contour Drawing
Contour drawing focuses on outlines. Artists carefully follow the edges of the face. This technique improves observation skills.
Gesture Drawing
Gesture drawing captures movement and expression quickly. Artists draw with fast flowing lines. This exercise loosens the hand and improves speed.
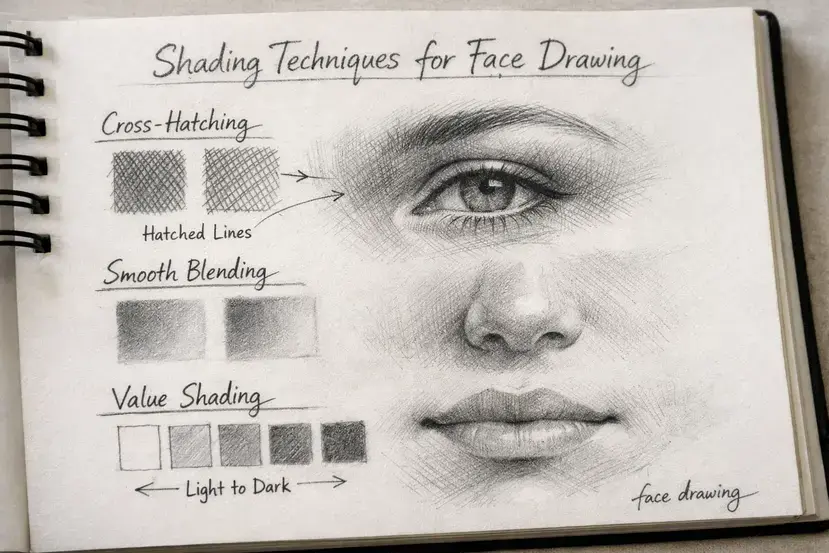
Shading Techniques
Shading adds depth to drawings.
Common methods include:
Artists study light and shadow to improve realism. These techniques define form and depth.
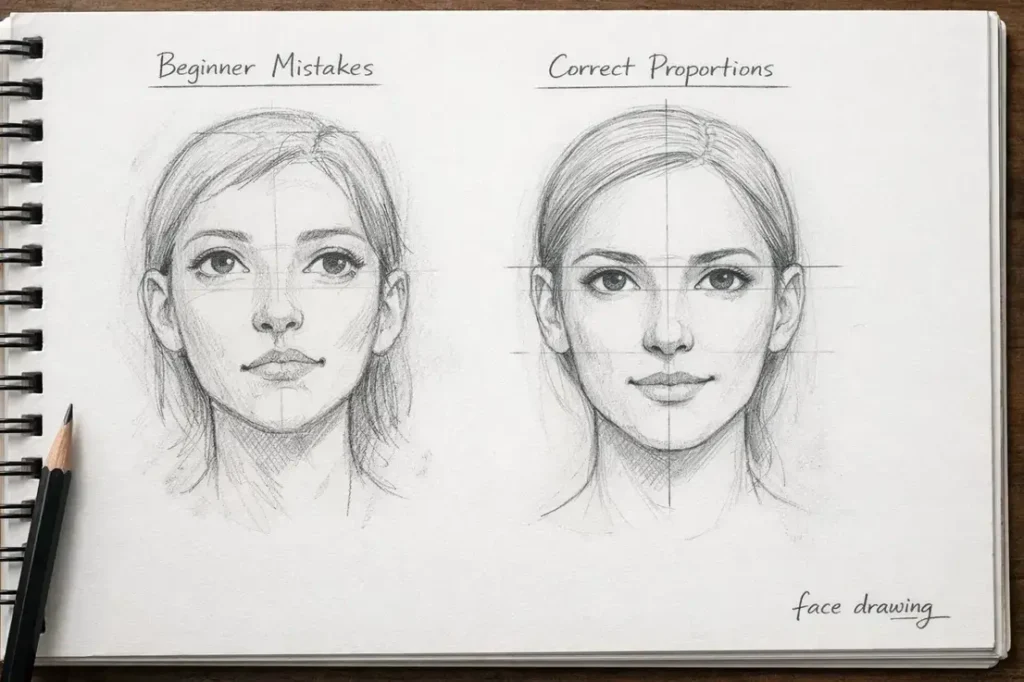
Common Face Drawing Mistakes Beginners Make
Every beginner makes mistakes while learning face drawing. Recognizing these mistakes helps you improve faster.
Eyes Placed Too High
Beginners often place eyes near the top of the head. In reality, eyes sit near the center.
Uneven Proportions
The nose or mouth may appear too large. Light guidelines help maintain balance.
Heavy Outlines
Strong outlines make faces look stiff. Use soft shading instead.
Over-Shading
Pressing the pencil too hard creates messy shadows. Build shading slowly.
Stiff Expressions
Faces look unnatural when artists focus only on outlines. Study real expressions to improve emotion. Even professional artists constantly adjust proportions during sketches.
How to Improve Face Drawing Skills
Improvement requires consistent practice.
Useful exercises include:
Regular practice improves accuracy and control, even in short sessions.

For structured portrait lessons, New Masters Academy offers classical face drawing courses taught by professional artists.
Final Thoughts
Face drawing requires attention to structure and proportion. The human face includes complex forms and subtle details. Small errors affect the final result. Accurate observation improves drawing quality. Regular practice strengthens proportion control and shading skills. Consistent study leads to more accurate and realistic faces.